This page provides troubleshooting guidance for common scanner, peripheral, and task-equipment problems. Routine setup and operating procedures are described in the relevant sections of the CCN Wiki and are linked here where needed. For each problem below, follow the troubleshooting steps in order and contact CCN Support if the problem remains unresolved.
If the coil wasn’t plugged in correctly or the scanner has been working continuously for a long time, unusual issues may occur during your protocol. These issues typically manifest as the scan not starting or acquisition stopping mid-sequence with strange activity on the bore screen.
If you encounter these problems, try the troubleshooting steps below in order, beginning with the least disruptive option. Proceed to a full system restart only if the earlier steps do not resolve the problem, as restarting the system requires additional time.
Right-click > Rerun From Here on the sequence that acquisition failed on.
If Rerun From Here is greyed out, it means the scanner has prepped the sequence and considers it already running. Click Stop first, then try Rerun from Here again.
This can help if you notice your sequence refusing to start (e.g., the status says “Preparing…”, then cycles back to “Waiting for User to Continue” without doing anything). Other typical accompanying errors include “Preparation of measurement system has failed” and “Dico failed to converge”.
Move the bed back to home.
Remove the participant or at least have them sit up.
Unplug the coils. Make sure the posterior coil is flush with the back of the bed and aligned straight within the square recessed area. Plug the coil back in.
The 32ch coil is sensitive to even small deviations in positioning. Be aware that being able to force the plug into the port does not mean you have set up the coil correctly.
Gently push the coil toward the bore to confirm that it is seated correctly. There should be no movement at all.
Confirm there are no coil file errors on the bore screen and no System Check errors on the console.
Re-align and send the participant back to isocenter.
Re-aligning the bed can help resolve the issue in which the bore screen reads “Isocenter” in positions that are not isocenter. This can be done even while you have a participant on the bed–just be sure to talk them through what’s happening.
Move the bed back to home.
Unplug and re-plug the coil connections.
Lower the bed down (as if you were preparing to have a participant climb up or step down).
Move the bed back to home. Re-align and try moving to isocenter again.
Redo the prep as if you were just beginning a new scan:
Move the bed back to the home position. Unplug and re-plug the coils. Re-navigate the bed to isocenter.
Re-register the participant. You can use the same Subject ID if you’d like–everything is timestamped, so the console will allow you to do this. You will just get multiple subdirectories under that ID’s folder in the DICOM server, differentiated by timestamp. If you’d rather have the new attempt saved under an entirely new folder at the Subject ID level, use a different ID.
If nothing is working, a reboot may be in order. Open the Staglin Operating Manual on the iMac computer to refer to the instructions for Standard Shutdown and Reboot Procedures.
If you have never rebooted before or have questions about the process, contact CCN staff to help walk you through the reboot steps.
This will take about 15 minutes from beginning to end, so make a decision appropriate to your participant’s and the users’ availability.
Click the button with the square on it, labelled “STOP”, at the bottom of the scan queue toward the left of the screen.
You should hear the sound of active acquisition stop.
Do not click the Pause button. It does nothing.
Restart a stopped sequence
The sequence you stopped will now be greyed out on the list, with a small jagged arrow icon to the left of the sequence name. If you hit the orange “GO” button at this point, it will continue on to the next sequence.
Right-click the sequence you stopped and click “Rerun from here”. This will un-grey the sequence, start it from the beginning, and continue on with the rest of the queue in the prescribed order.
If you are trying to redo a sequence that you stopped several series ago, without rerunning all the other sequences in between, copy the sequence of interest and move it to the point where you want it run instead. You can either:
click on the sequence and drag it down to where you would like it to be run, or
right-click the sequence, choose “Copy”, right-click at the bottom of the queue, choose “Paste”, then click and drag to the desired position.
Delete an upcoming sequence
Right-click the series and click “Delete”.
This will remove it from the queue you are currently running, but will not delete it from the exam card as it was designed and intended to be run. Meaning, if you are pressed for time and need to make a real-time decision to skip sequences, be assured that you can delete sequences from the currently-running program and the entire original protocol will still appear the next time you start the study.
Close the participant
Click the X on the “Patient” tab at the top left of the screen and choose “Close Patient”.
Do this at the end of every scan, whether you are finishing as planned or have to end the scan prematurely for other reasons. Do not leave your participant’s images up for everyone to see.
If you try to close the participant while paused between sequences, you may find that the “Close Patient” option is greyed out and you cannot click on it.
Start the next sequence and stop it again immediately–the “Close Patient” option should now be available to you.
This occurs because the software automatically prepares the next sequence after it finishes the current one, so you cannot close out when the scanner is already primed to continue. Allowing the primed sequence to begin and stopping it tells the system that the user wants the procedure stopped and it is now okay to close out the registered patient.
Correct registration information
If you realize that the registration information is incorrect for your participant, you should correct it. This is especially important for the Last Name, Participant ID, and Referring Physician fields. Incorrect information will cause your data to be mislabelled or sent to the wrong folder on the DICOM server.
If you have progressed to the scan screen (but not yet started):
Click the X in the Patient tab to close out the Participant window
If you are in the middle of scanning:
Finish the scan. Do not stop mid-session to edit Registration.
See the instructions below.
If you have already finished the scan:
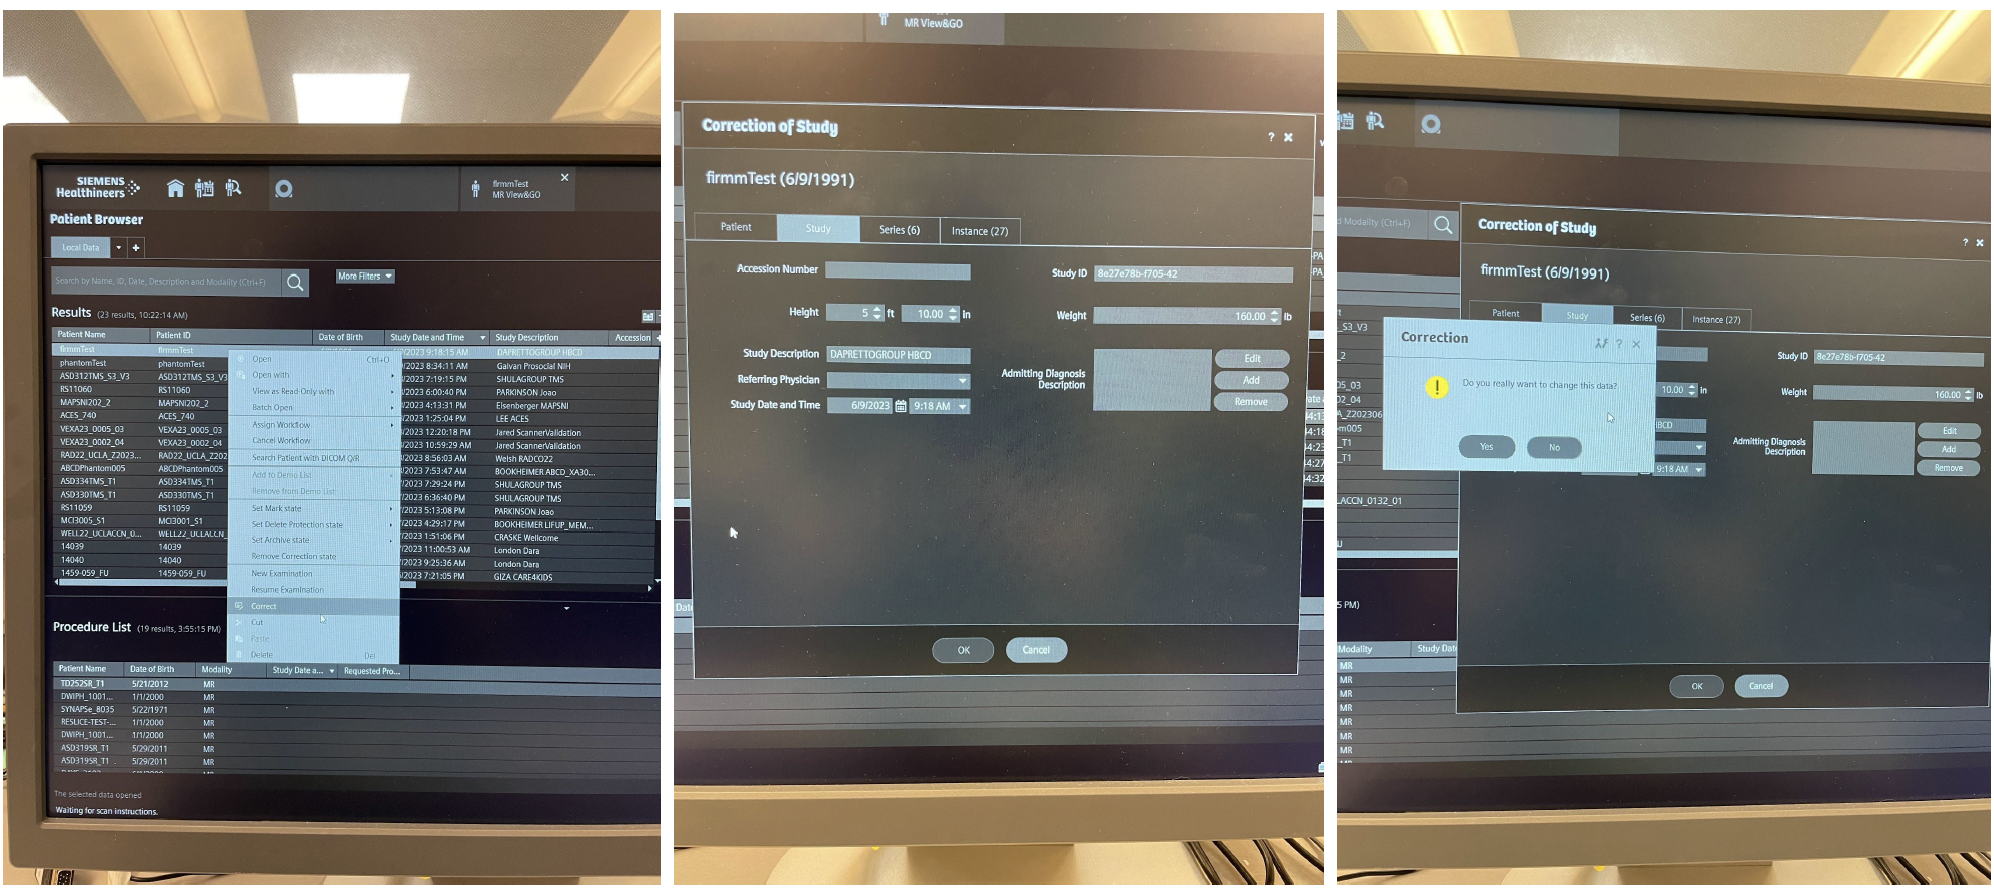
Navigate to the Patient Browser by clicking on the “Person with magnifying glass” icon at the top of the computer screen
Right-click on the subject ID you would like to correct and select ‘Correct’ from the option menu
A Correction of Study window will appear
Make your changes and export the data again in its corrected form.
(Re-) Export Data
Click on the “Person with magnifying glass” icon at the top of the computer screen
Click on the scan that you want to export. If you only want to export specific sequences, not the entire scan, you can select them from the smaller window that opens up to the right.
Click on the “Export” button toward the upper right of the screen
Click on the “Network” radio button if it is not already selected
Select the server(s) you want to send the data to.
The usual DICOM server is called dicom_server1. If you are part of one of the large consortium studies, you may need XNAT, FIONA, or HBCD-FIONA.
Make sure to un-check all servers you don’t need. If you do not de-select them, your data will be sent to other sites and this will cause confusion.
Make sure you have the correct password (message CCN admins if you can’t remember).
Restart the computer. Sometimes the iMac will give you a “Welcome” message as though it’s logging in, then kick you out anyway with an “incorrect password” warning. Rebooting seems to resolve this.
Task is failing to trigger
Exit your task and close the host program completely.
Disconnect the trigger cable.
Reset the button box configuration on the silver box under the console desk.
Reconnect the trigger cable before restarting the task program.
This restart routine is usually sufficient to fix trigger problems, because most of them arise from the task program not communicating with the task computer correctly. Do not disconnect and reconnect the trigger USB while a task program like MATLAB is running. Many programs do not reliably detect and initialize devices that are not already connected upon startup.
If the trigger is still not working, start again from Step 1. Add another step between #2 and #3: go into the scanner room and replug the button box into the fiber bundle. Be gentle when disconnecting and firm when reconnecting.
Pulse monitor isn’t working
Confirm that the pulse monitor is close enough to the scanner to be detected.
The HR monitor needs to be close to the scanner before the computer in the control room will detect it on the physiological display.
The bore screen should show physio readings and any relevant error messages when it senses that the monitor is nearby.
If you try to test or check the monitor device from the control room, the waveform will not change and the battery icon will show red regardless of actual charge.
Check for sufficient battery charge.
The small square lights at the top left of the device are the charging indicators. Dark means the device insufficient charge. Red means low charge. Green means sufficient charge.
The most common reason for the HR monitoring device to fail is insufficient charge. If the charge is depleted at the beginning of your scan time time, you will unfortunately not be able to use the HR monitor for your session. If you are setting up very early, you may plug the monitor into its charging port and try to restore enough power for your scan.
Place the monitor into the charging port and push down firmly to make sure it is seated completely. The charging indicators will flash green when the device is successfully charging.
Be sure to leave the monitor in its charging port properly after using it. It is easy to unintentionally leave it in a discharging state by not seating it correctly. This means the battery will be dead for the next group who needs it.
Check the finger-detection indicator and participant finger position.
The small light at the top right corner of the device is the finger detection indicator. It will shine red when the sensor is not successfully picking up on a physiological signal. The bore screen will also display an error message.
When you see this light and/or error, it means no finger is detected–whether this is because there is no finger in the clip yet, the finger is improperly positioned in the clip, or the sensors in the clip are not positioned correctly to pick up on the signal.
Inspect the light and sensor openings for obstruction or misalignment.
Look inside the finger attachment. There are two small, oval-shaped holes inside: a red light is projected through one and received by a sensor in the other. Make sure neither the light nor the sensor are occluded by the attachment. Check that when you put the monitor on, the light is over the fingernail.
If you do not see the red light at all, the sensor loop has gotten shifted around and is now positioned incorrectly within the clip. Remove the rubber finger attachment completely by gently pulling on it–it should slide off easily. Straighten out the sensor loop inside and replace the attachment so that the red light properly shines through one of the holes. Make sure the sensor is not blocked on the opposite side of the light, then try inserting a finger again.
Inspect and clean the finger attachment.
If nothing seems to be wrong with the sensors, check the finger attachment itself. Make sure it is undamaged and snugly encases the sensor loop inside.
If the attachment is ripped or missing, there are new ones in the scanner suite in the labelled drawer with the other physio equipment.
If it does not appear damaged, clean it thoroughly and try again. Sometimes a careful cleaning helps recover the sensor’s sensitivity.
If the problem persists, contact CCN support.
MR-safe glasses
Cleaning the glasses
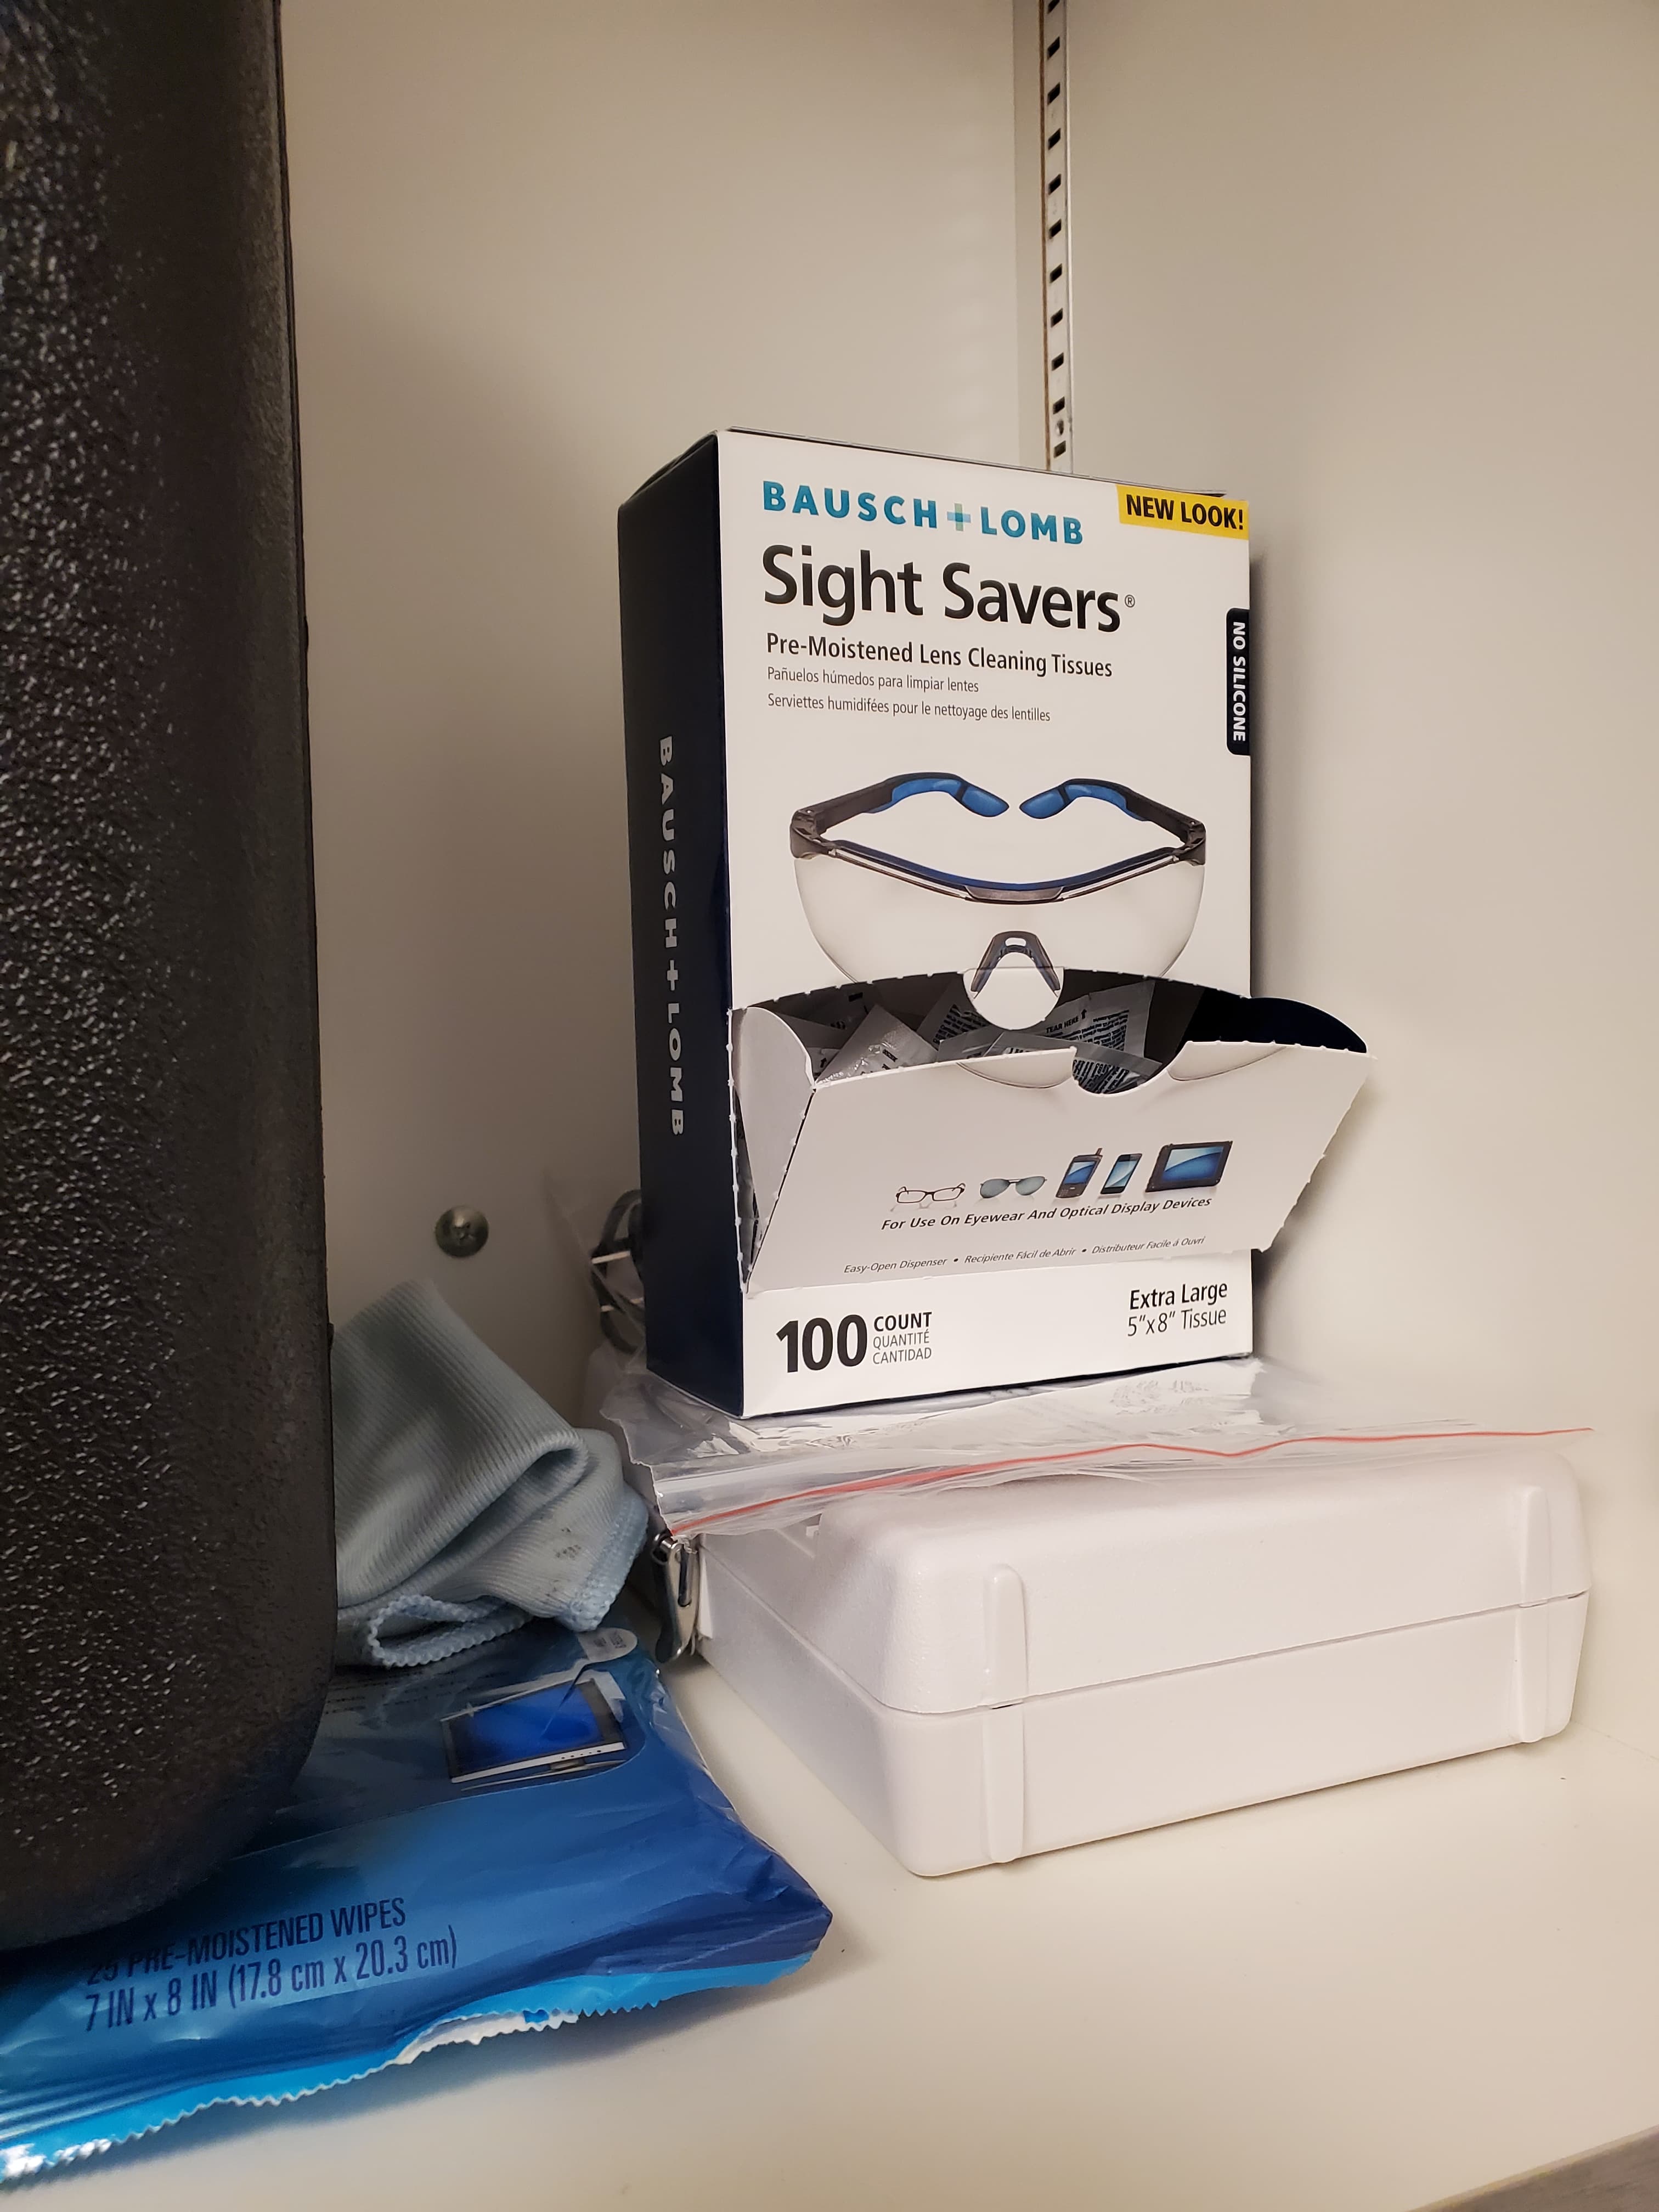
There are supplies (glass-cleaning solution, wipes) for cleaning the MR-safe glasses in the same cabinet where the glasses are stored. Please use them, not the Lysol wipes, to clean the glasses without damaging them.
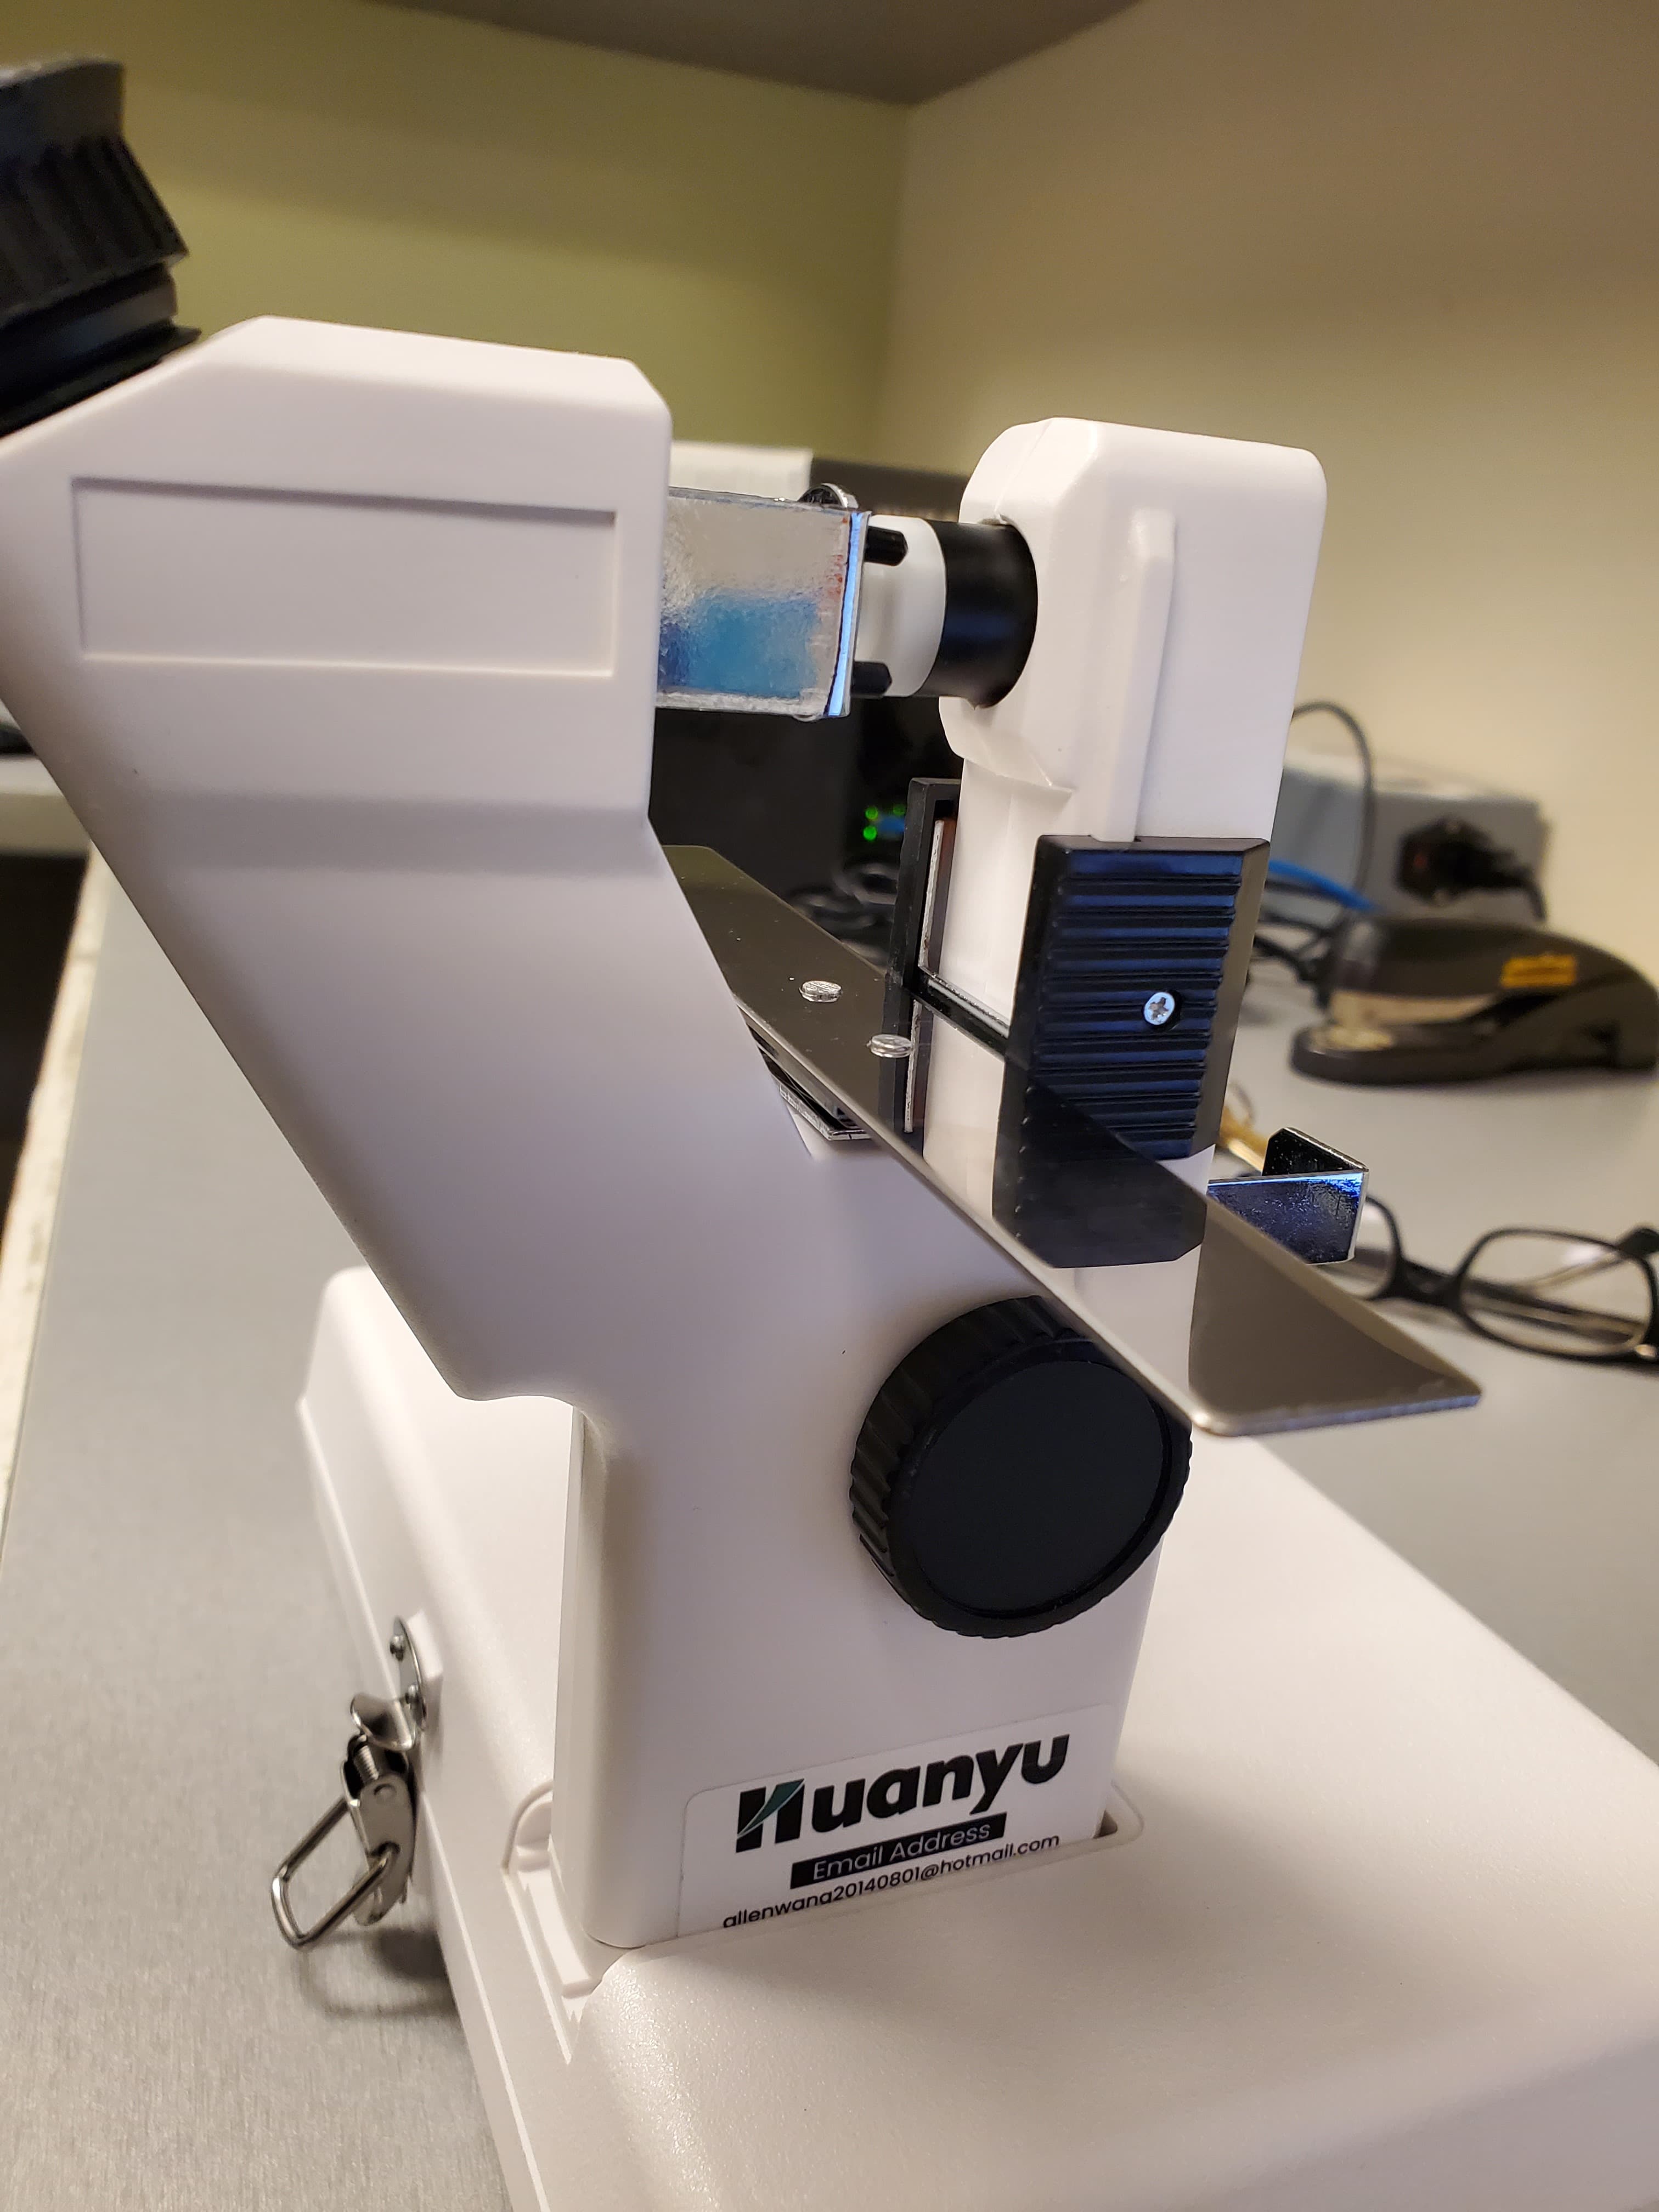
Lensometer
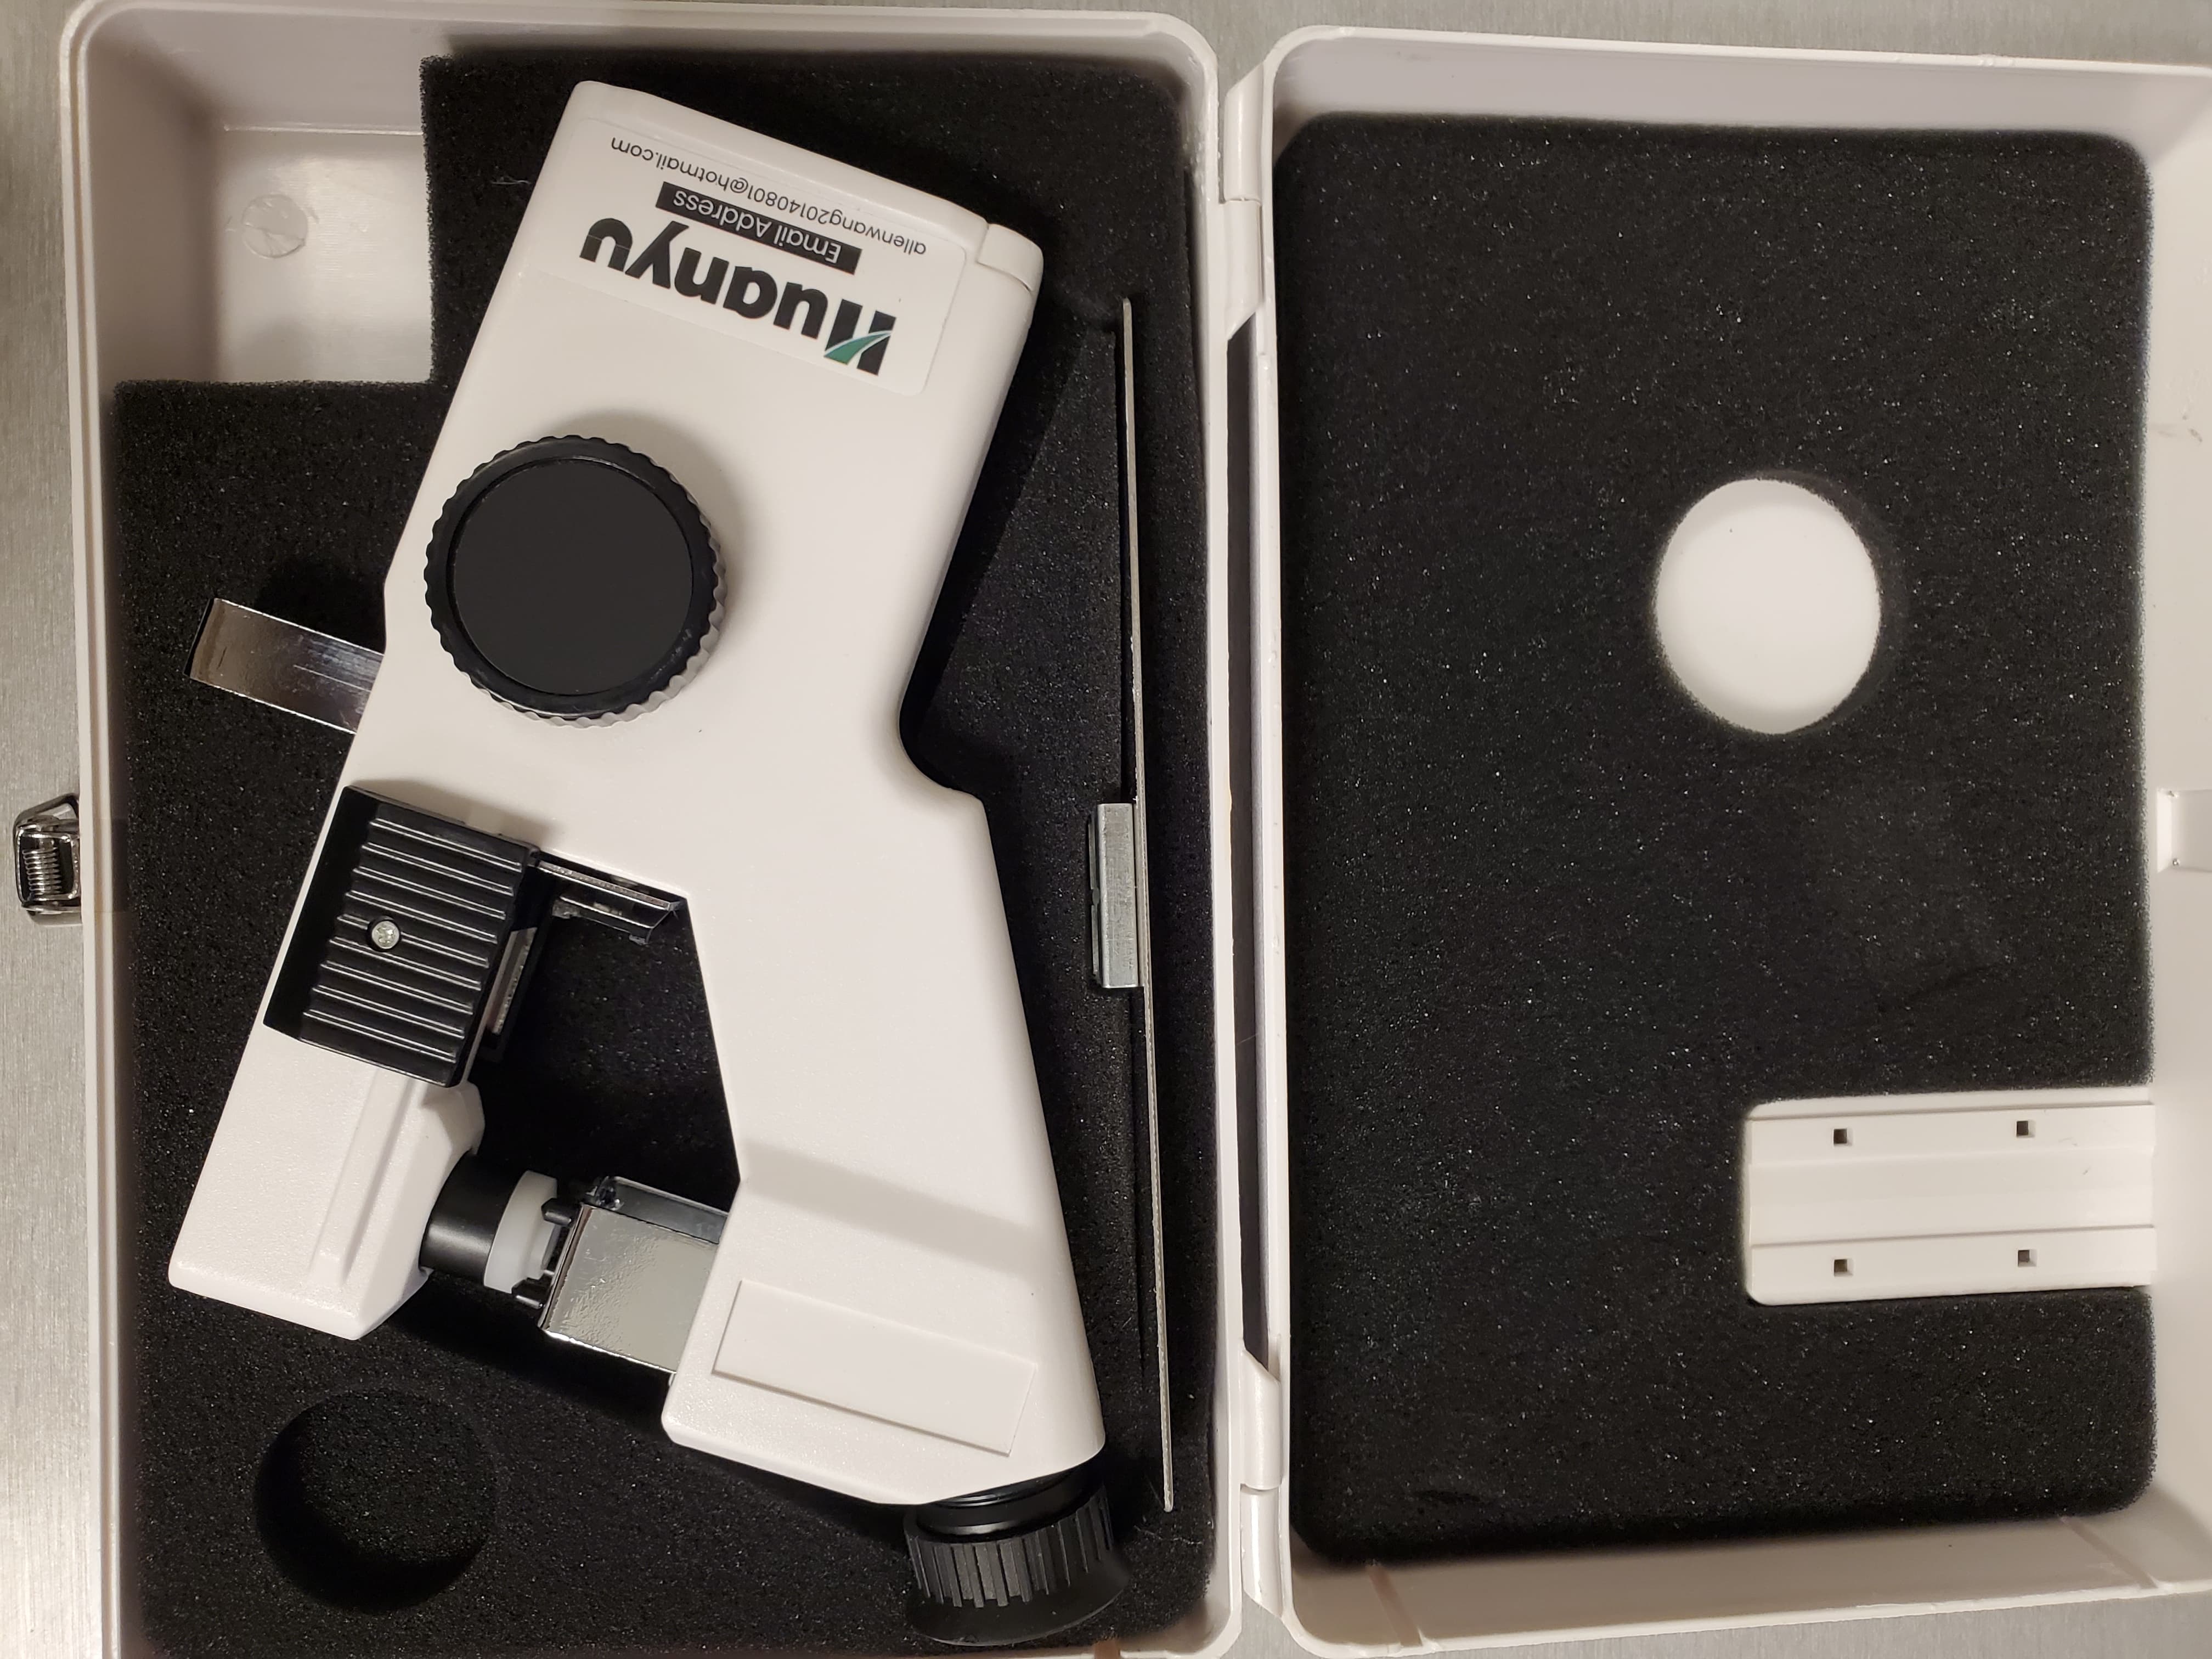
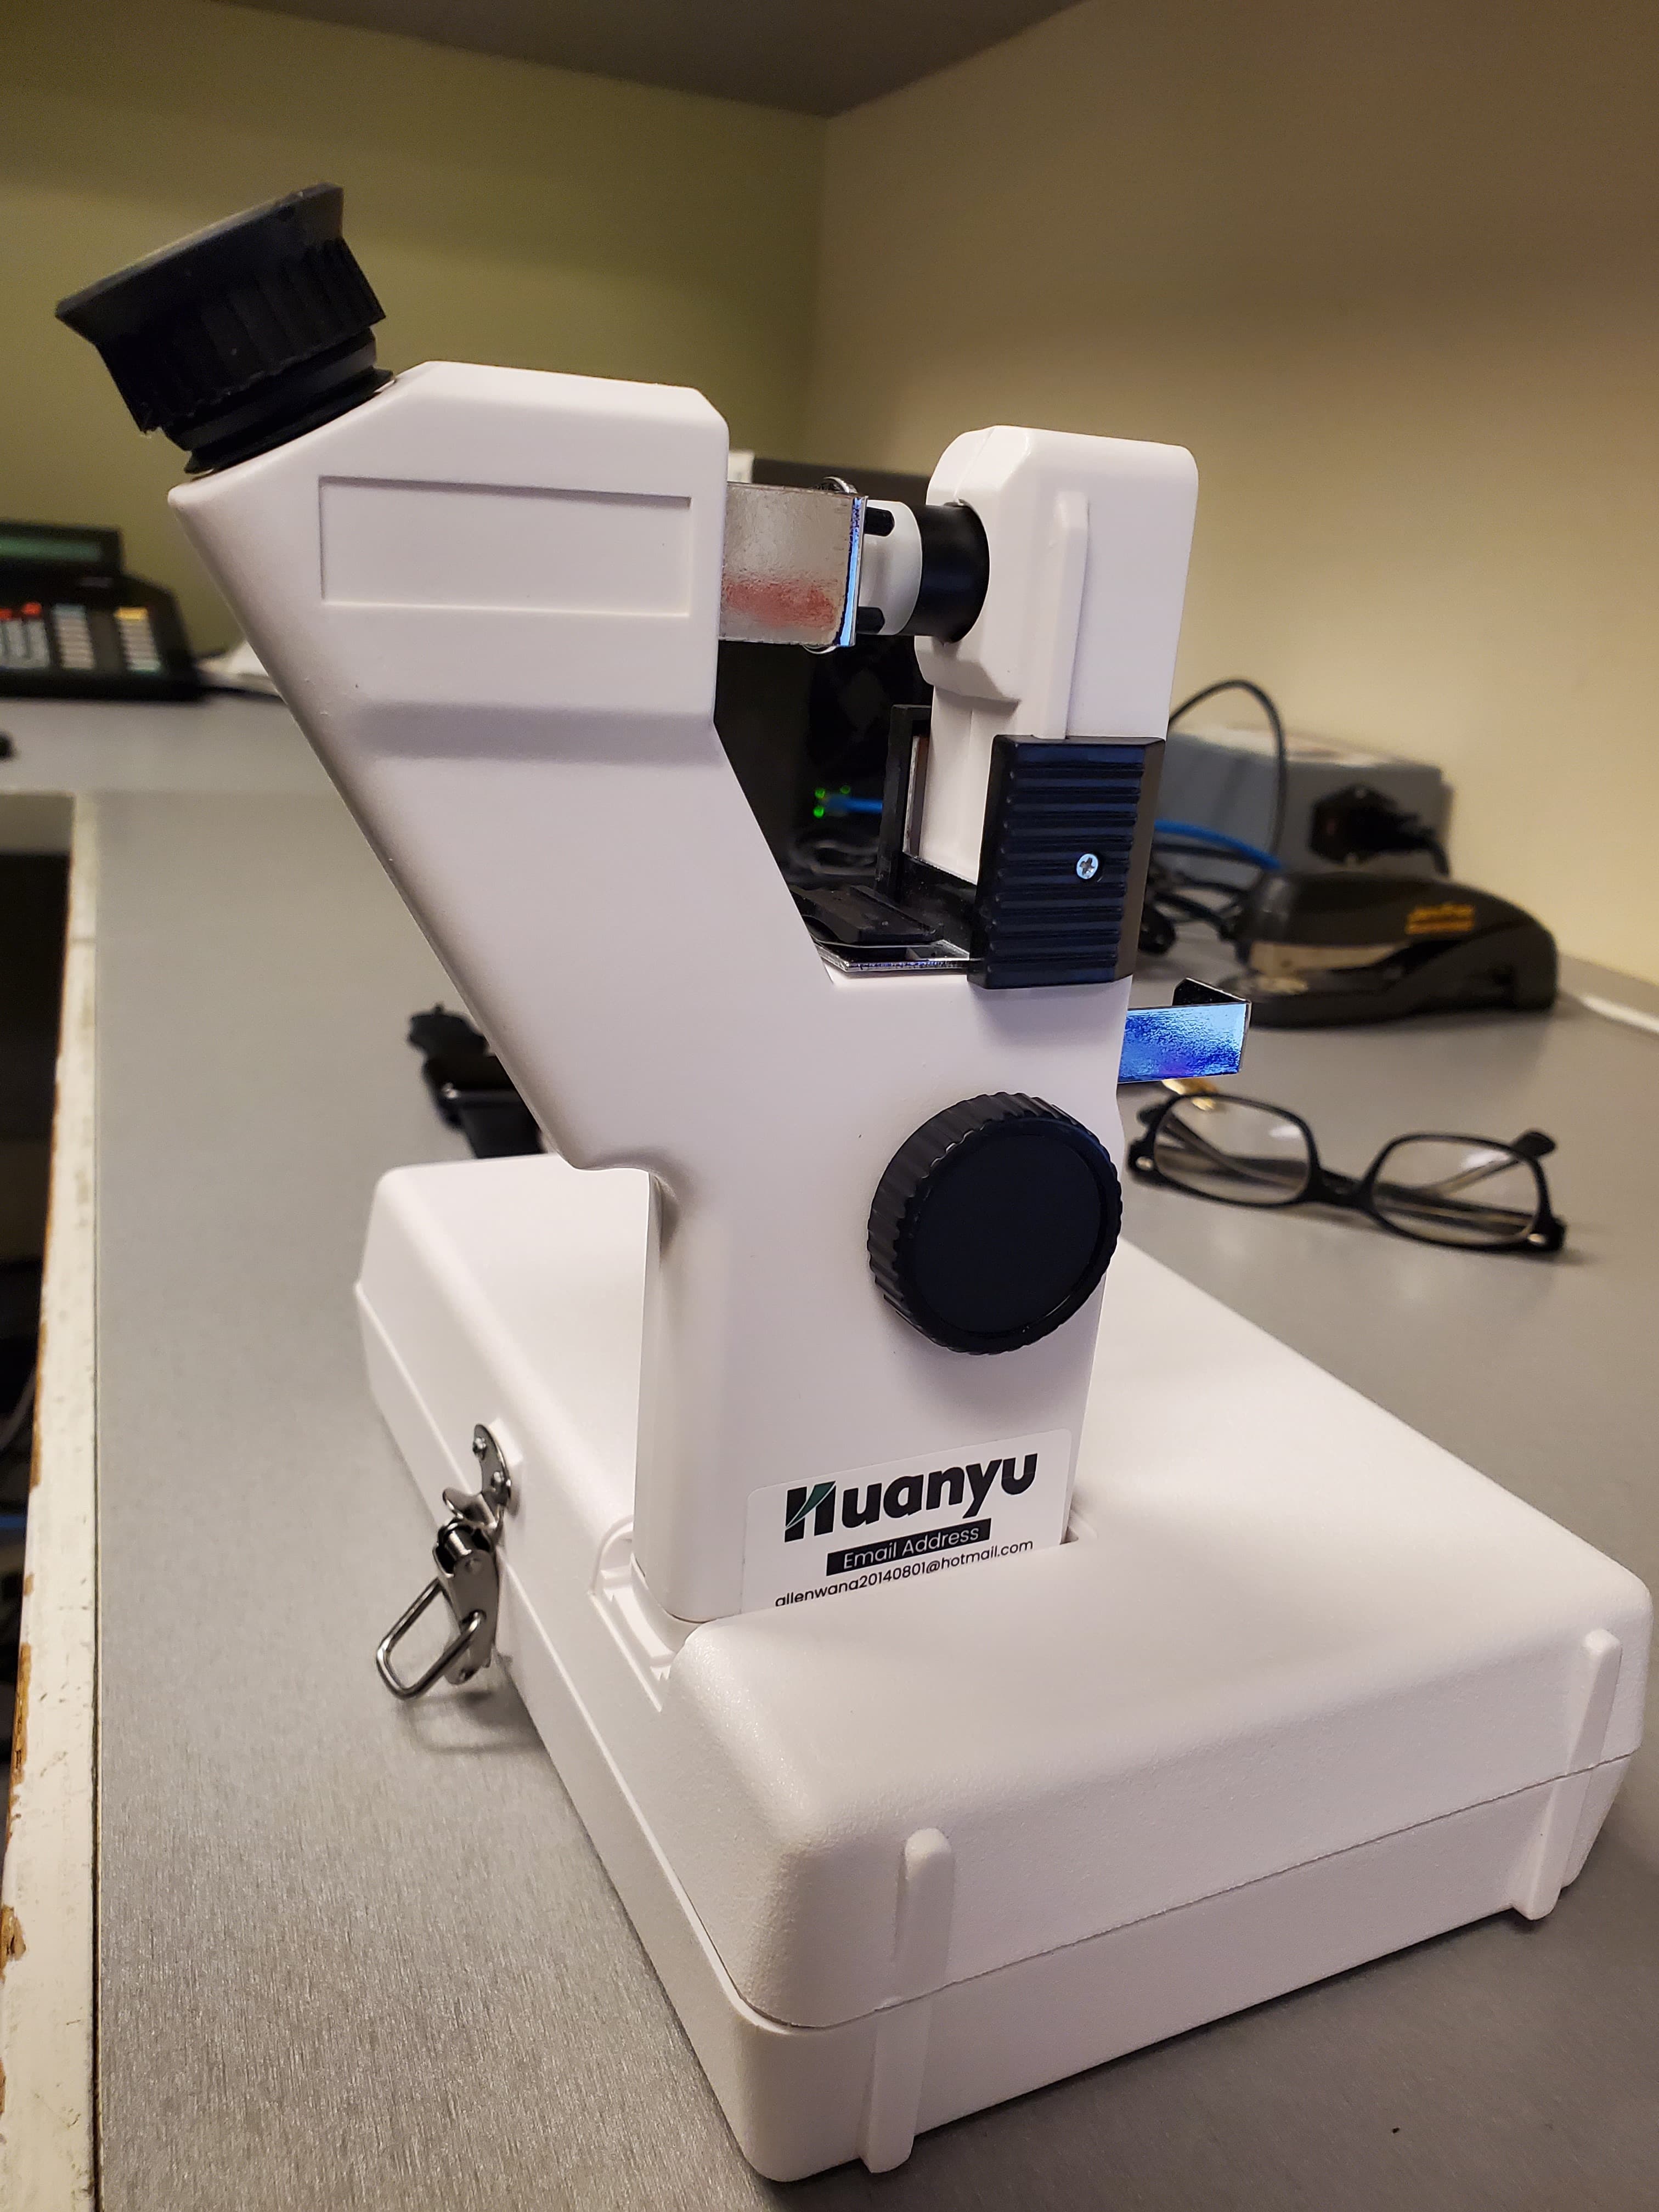
A tool for measuring the prescription on an eyeglass lens.
It works, but is not the easiest tool to use, so is not generally recommended for helping you determine the prescription of a participant’s glasses. Typically used by staff to check the prescription on the MR-safe lenses when the labels have worn off.
The device is stored in a small, rectangular box in the cabinet with the MR glasses. Find the white box under the cleaning wipes.
Open the box and remove the components within.
Connect the largest piece to power using the black cable.
The tool can also run on battery power. However, it seems to behave unreliably when both power sources are used, so we recommend leaving the batteries removed.
Stand the largest piece upright and slot it into the divot on the outer shell of the box.
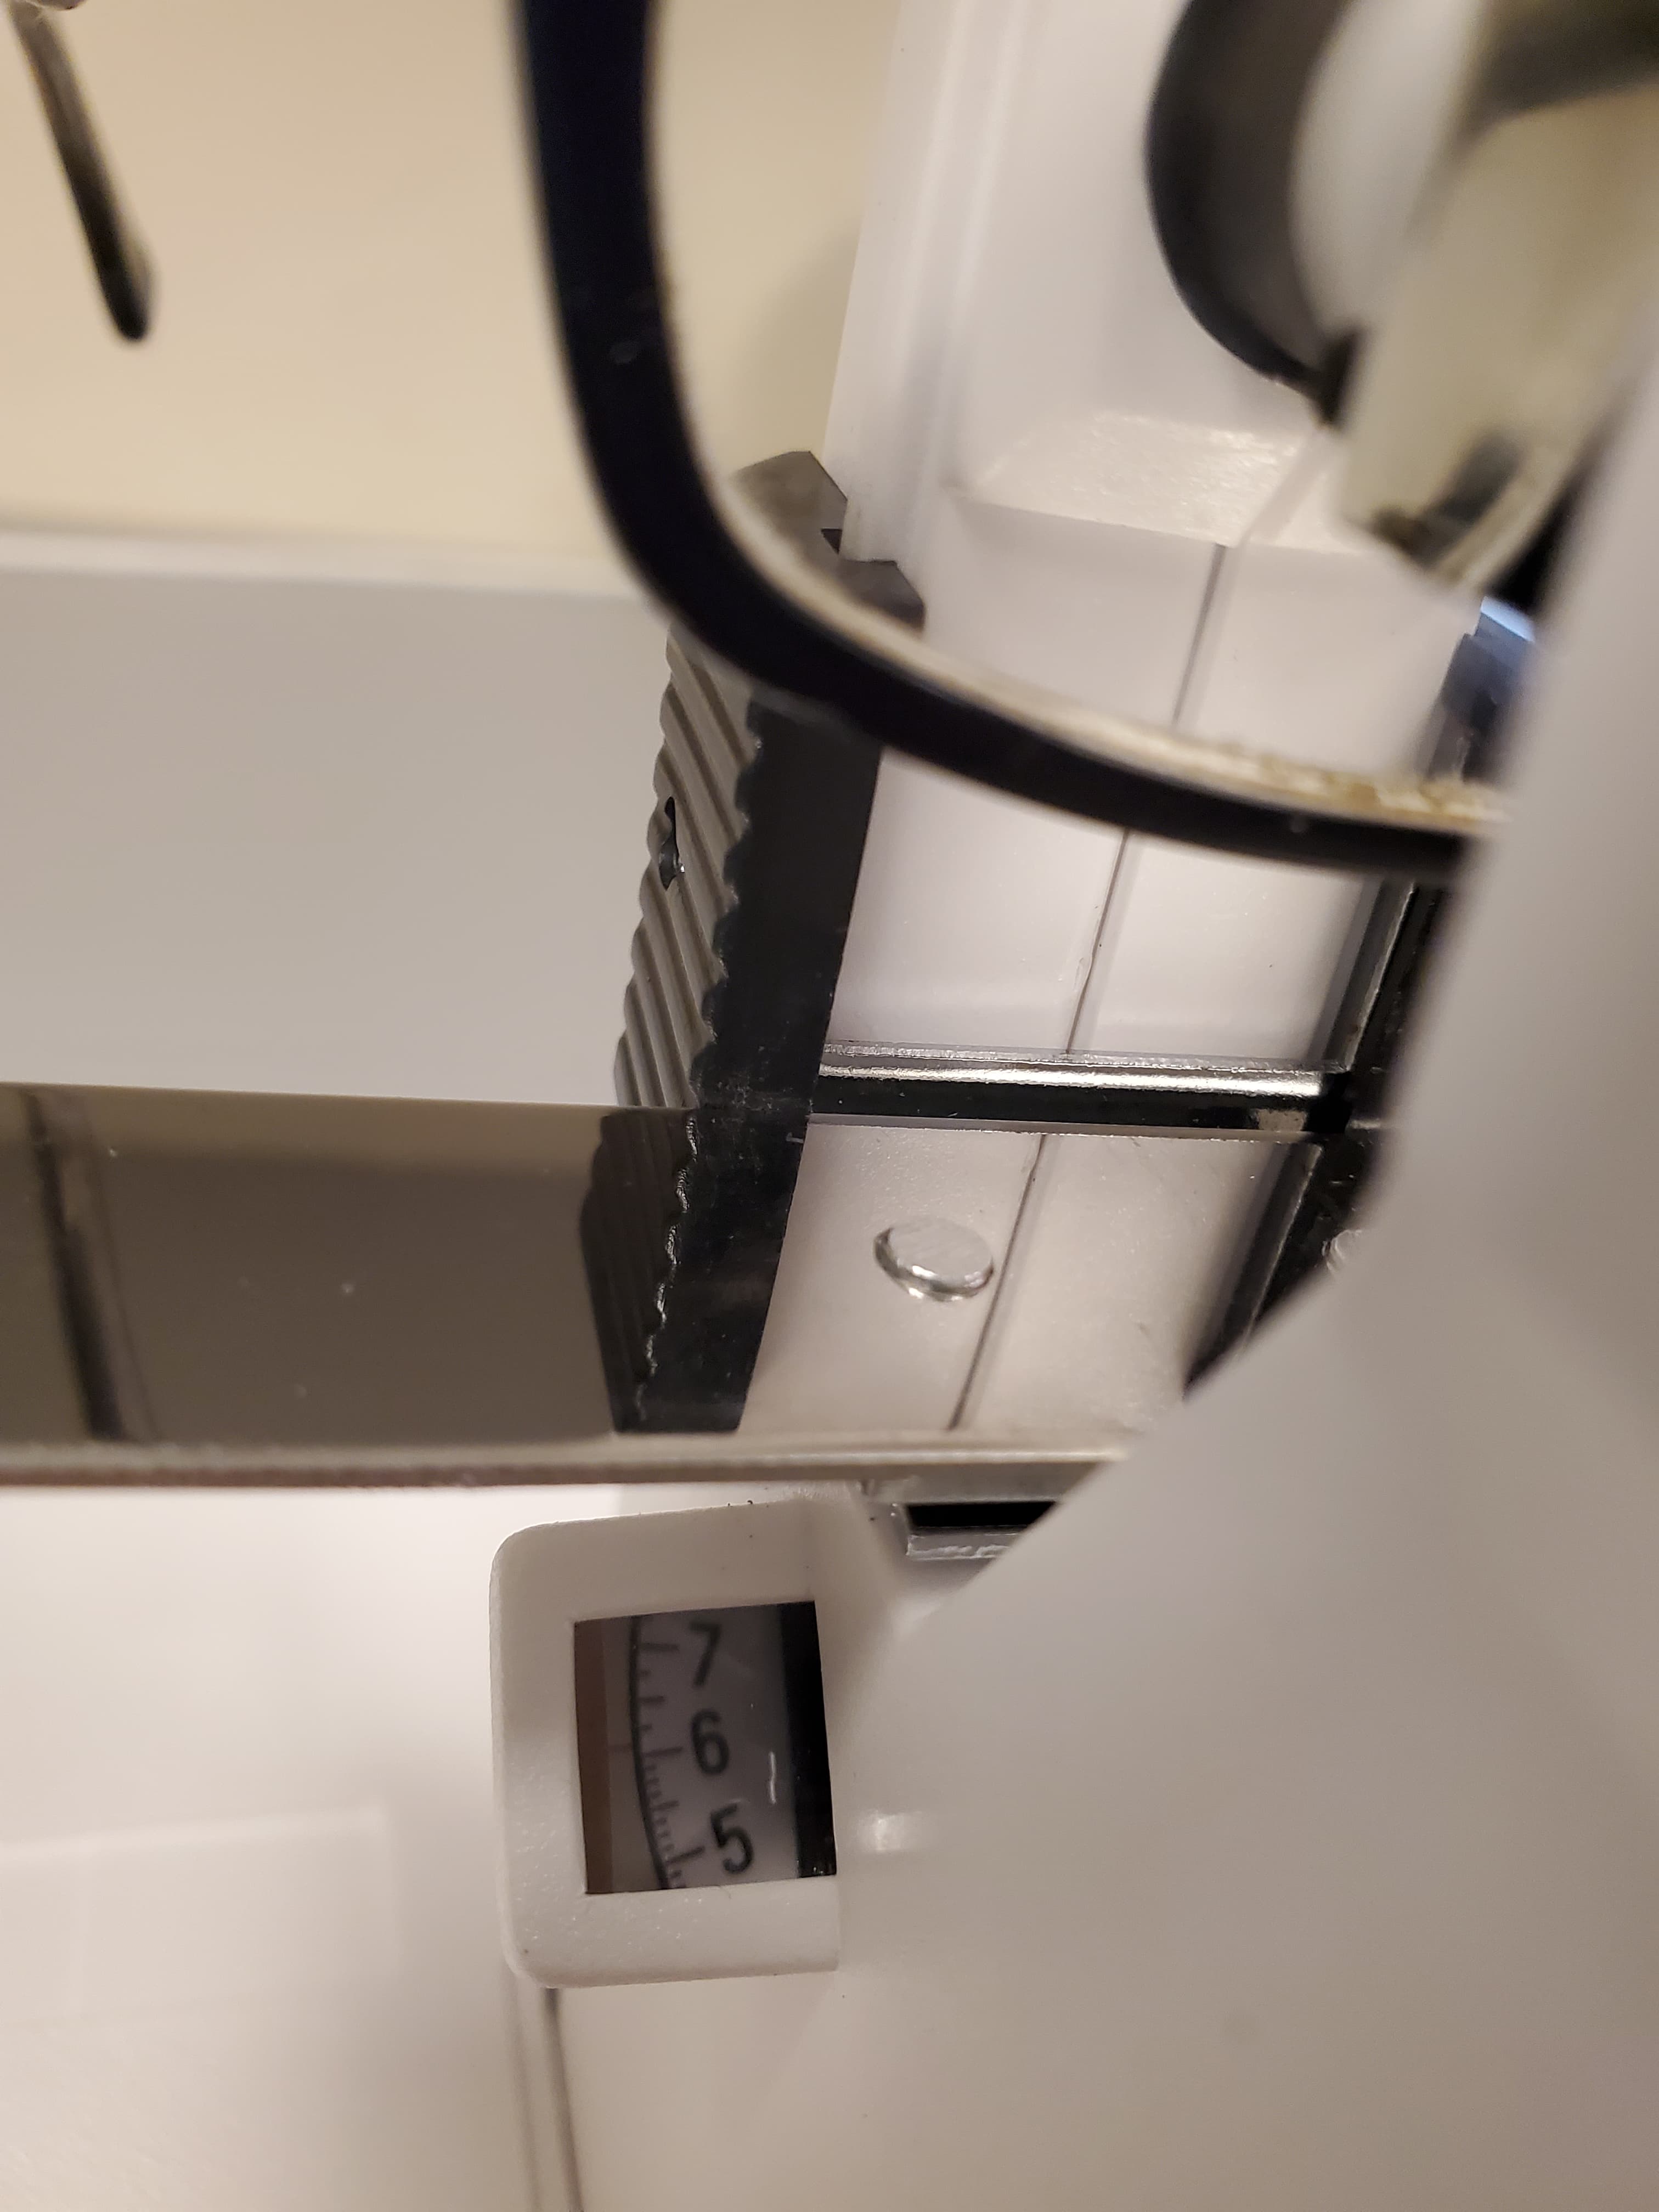
Squeeze the silver trigger on the back and hold the lens in position.
Look through the eyepiece and find the green starry shape that defines focus.
Read the small window on the left to see the corresponding prescription.
This may happen if a group forgets to turn the system off at the end of their session and it stays on for a long time before finally being switched off. Turn the unit off and leave it off for at least a few minutes, perhaps while you are setting up and registering your participant. Try pressing the switch again–a few cycles of downtime and switch flipping has always been sufficient to turn the unit back on in the past. If you have tried at least three times (not in rapid succession) and the system still won’t turn on, contact CCN support.
The task/computer audio isn’t playing through headphones
If your participant reports no audio from the computer you are playing it from, but can hear your voice as you speak to them, check the cable connections at the back of the Optoacoustics box. The skinny black cable (labelled “Optoacoustics”, connects the box to your computer) should be plugged into the “Line 1 In” port.
Turn off the Optoacoustics box. Replug the skinny black cable (labelled “Optoacoustics”) and the other, slightly thicker black cable to its left (the power cable).
Check that the two round, silver buttons on the main face of the box are both pushed in.
Check that your computer volume is turned up.
Check that the volume knob on the box is turned up and the balance knob is in the middle.
Audio plays through one side of headphones only
Check that the balance knob is not turned all the way to one side. Turn off the box and leave it off for a few minutes. While waiting, replug the Line 1 In cable. This is the skinny black cable labelled Optoacostics that connects the box to your computer.
Replace the Line 1 In cable. Find a new aux cable in the control room cabinets (likely in the box labelled “AV Cables”) and try using it.
Audio output is unbalanced
Check the knob in the upper left corner of the back of the unit. Turn it until the dot at the top of the dial is lined up in the middle. The knob should always stay in this position, as it ensures that the audio will not be played in one ear more than the other.
Users in control room cannot hear task audio
If your participant can hear the audio playing from your computer, but you cannot, first check the speaker knob at the top-right side of the box. Turn it up if it is low.
Press the circular button right below it. It should be lit green.
Replace the Line 1 In cable. See the section directly previous, as these problems sometimes occur together and can both be resolved with a new cable.
Noise cancellation stopped on its own
The most common reason that noise cancellation stops completely is because the stimulus presented is too loud and overshoots the safety threshold (111dB).
This can be avoided by making sure the volume on your stimulus machine remains at max. Adjust the volume of the headphones using the ‘Line 1’ dial on the top of the unit.
Do a volume test before your scan starts.
Start with the ‘Line 1’ volume dial in the middle (facing the top), and adjust as needed.
Note: There is no need to adjust the ‘Line 2’ volume dial, it doesn’t do anything to affect the sound unless you have two volume sources!
Noise cancelling is fading
Studies that run numerous functional tasks, or have sequences in between functional runs that don’t use the ANC function, will notice that over time the algorithm used to produce the noise cancellation may fade and the quality of the noise cancellation will diminish.
The most effective way to avoid this is adding another short learning sequence into your protocol.
Stopping the algorithm just before the end of your sequence, then starting the algorithm again just after your next sequence begins has proven somewhat effective in keeping the ANC feature intact.
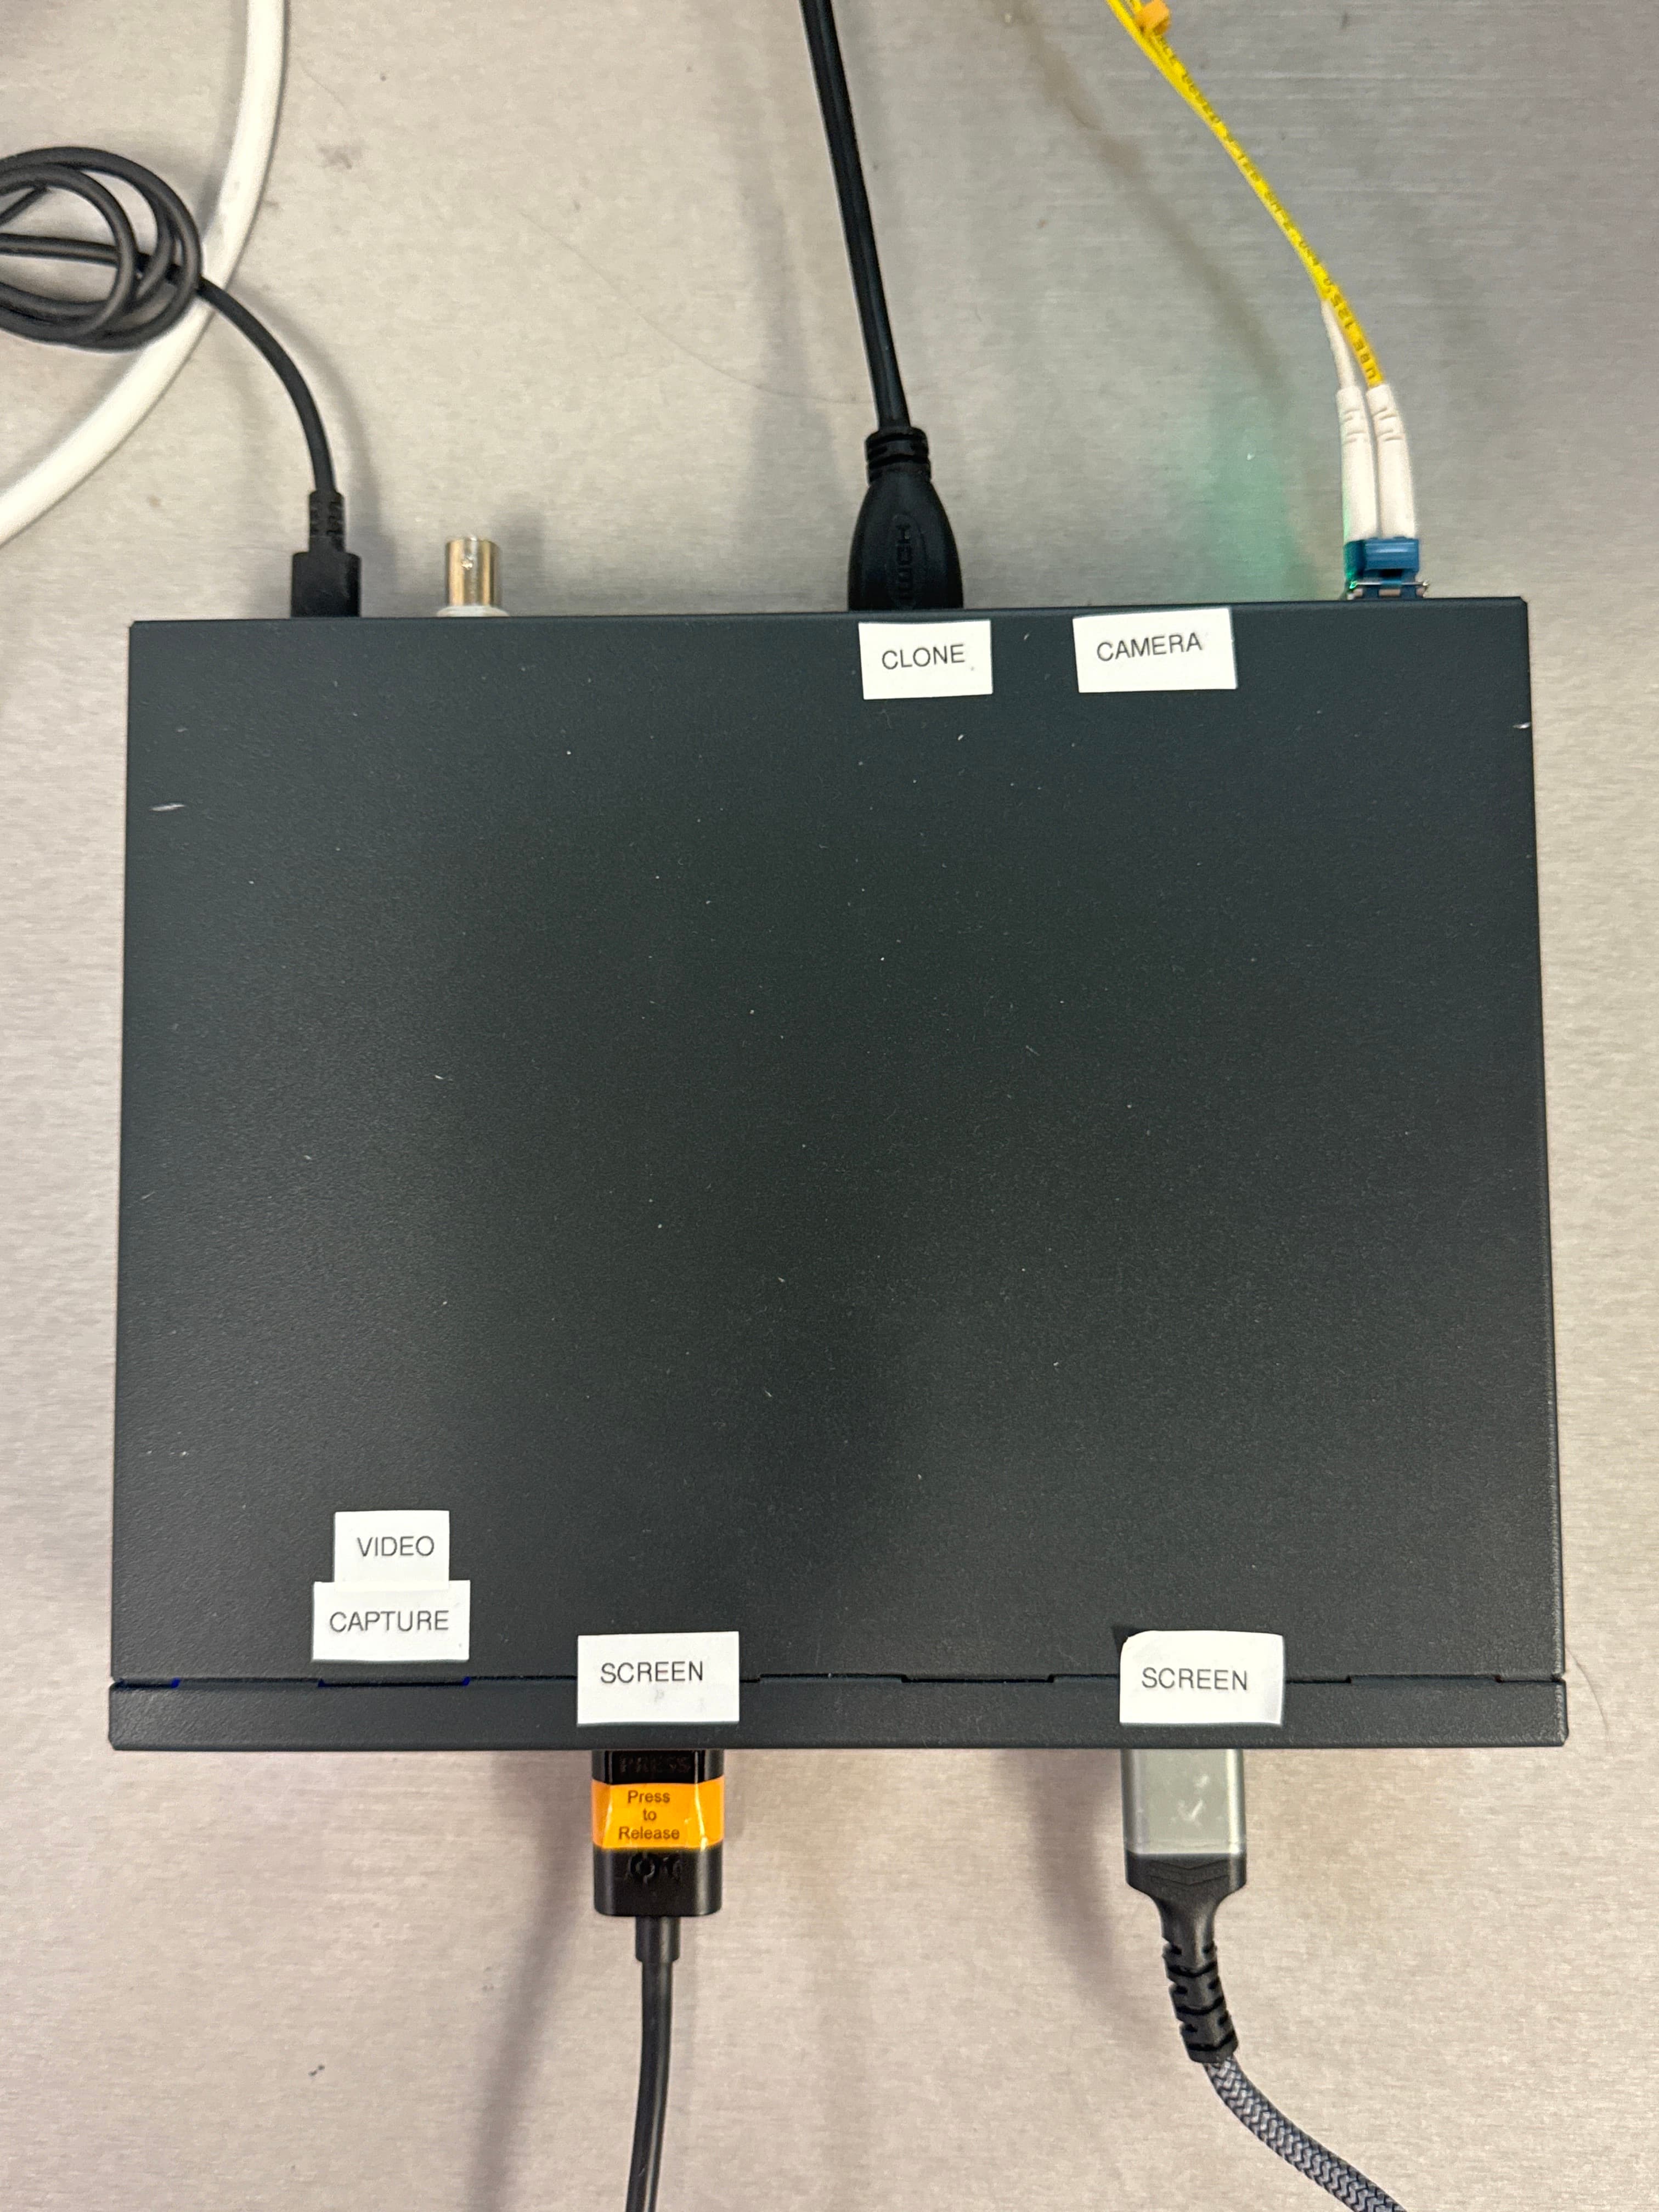
Always make sure the power to the AV hub is on and the HDMI/DisplayPort cables are plugged into the correct places! Check against this reference:
Normal Configuration
Review the labelled ports carefully.
CLONE: Reproduces the BOLDscreen display on the control room monitor.
SCREEN (left): DisplayPort - USB-C connection.
SCREEN (right): HDMI-HDMI connection.
BOLDscreen isn’t displaying
First-pass Checks and Resets
Make sure that the AV hub box is turned on. There should be a light on at the leftmost side of the box and a red/green light flashing from the back.
Make sure that the correct input is selected. An orange light should be illuminated on the front of the AV box, to the right of the input you are using. Press the corresponding button if not.
Do not plug in multiple inputs. There is no need to connect both the HDMI and DisplayPort cables to your laptop, for example, because the input selection button will determine which one is used.
Check that all the cables are plugged into the correct ports. See the picture and description above for reference.
Disconnect and reconnect the cables between the AV hub and your laptop. Check that all other cables are firmly plugged into their proper, labelled positions (see image above).
If you usually use HDMI, try DisplayPort instead (or vice versa). You may need to use an adapter to try the new connection method.
Try an(other) adapter. There are several in the box by the window (please return whatever you use to the box when you’re done).
Do not use adapters unnecessarily. For example, the DisplayPort cable can connect directly to the iMac through a USB-C port. There is no need to introduce an adapter into this connection.
Only add “redundant” adapters if you test and see that they are necessary to get your display working.
Disconnect the clone. Unplug the cable labelled “MONITOR” from the “CLONE” port. This means you will not be able to see what the participant is seeing on the BOLDscreen, but if disconnecting the clone helps, it may mean that the external monitor was drawing too much power and causing issues with your display.
Restart the AV hub. Press the power button at the leftmost side of the front of the box. Wait a few seconds, then press it again to turn back on.
CCN iMac Test
If resetting the hub/cable inputs did not help, try plugging the display HDMI into the CCN iMac. This is often a reliable test as to whether it is a BOLDscreen/display issue or a specific laptop/machine issue.
If the BOLDscreen works when the display cable is plugged into the CCN iMac, the issue might be with your device’s display settings. Check the settings like resolution, refresh rate, display mirroring vs. extended etc. on your task computer.
Check your adapter, if you are using one to connect the HDMI cable to your laptop. Make sure it is clean and completely plugged in. If the screen works via the iMac and resetting the hub didn’t help, your adapter may not be working. Look for a spare adapter in the box on the window ledge. There are also more adapters in the labelled cabinet.
If the BOLDscreen doesn’t work when the display cable is plugged into the CCN iMac and further testing with the adapter isn’t an option (the correct spare isn’t available, you know the original adapter is not the problem, etc.), notify CCN staff. There may be an issue with the BOLDscreen itself.
Task Laptop Checks
Restart your laptop. Sometimes, even closing and reopening the lid will recover the connection.
If you usually duplicate displays, try extending. Certain laptops and/or programs are susceptible to crashing in mirror mode specifically.
Archived: BOLDscreen 24 Display Issue
The old BOLDscreen used to encounter display problems due to interactions with the HDMI splitter and/or processing chip of the task laptop. The issues are documented here for archival purposes.
BOLDscreen Coloration Issue
There is a known bug with newer MacBooks where the image has a pink tint. This is actually not an issue with the BOLDscreen, but with how the color settings on the Macbook interact with the HDMI splitter.
This is hopefully no longer a concern after the January 2024 upgrade (from the 24 to the 32 UHD BOLDscreen), but for documentation purposes, these were the two workarounds available:
Intel Based Chips: If the Macbook has an Intel processing chip (i5, i7 etc.), there is a script available which will correct the color settings to allow use with the external monitor. Please make sure to have Ruby downloaded onto your Macbook and download the patch from this GitHub site. If the user would like to attempt with assistance, please follow instructions from this Github site. Reach out to CCN Staff to coordinate patch if assistance is desired.
Silicon Based Chips: If the Macbook has an Apple Silicon chip (M1/M2), then the current script doesn’t work unfortunately. The workaround is to bypass the splitter altogether. This does mean forgoing the external monitor.
Unplug the BOLDscreen HDMI from the back of the HDMI splitter (labeled BOLDscreen)
Connect any adaptors necessary to the BOLDscreen HDMI and plug into Macbook
The Macbook should be mirrored onto the BOLDscreen without any discoloration or tint
Once the session is over, make sure to plug the BOLDscreen HDMI back into the splitter
Please make sure the grey USB cable (labelled “TRIGGER”) is plugged into your device and you have set up the configuration box (silver, underneath the desk)!
Button box isn’t working
Redo the button box setup
Unplug the trigger cable. Close your task program.
Plug the trigger cable back in. Make sure it is firmly connected.
Redo the settings on the controller box as outlined by the instructions taped directly above it. Remember that steps 3 and/or 5 will be different depending on whether you are using the 2-button box, 4-button box, or trackball mouse.
Open a text editor (Notepad, txtedit, Word, Pages, etc.). Ask the participant to press buttons. The presses should appear in the text program as the numbers 1-4.
If the numbers do not appear, the signal is having trouble reaching your device. Skip to the next section.
If you do see the numbers coming through, the button box is working. Start your task program back up and try again.
Caution
It is important to follow this order. Often, software will run a check on all connected devices upon startup, so if you replug a cable while the program is already running, it may not detect the connection. Plug the trigger cable in first, then start up your task program.
Test the signal
Unplug the trigger cable from your device and connect it to the iMac instead.
Open a text editor and ask the participant to press buttons.
If the numbers appear, the problem is with your task laptop, not the trigger cable or button box setup. Try another port and/or another adapter with your laptop.
If the numbers do not come through, the problem is with the trigger cable or button box setup.
Watch the configuration box under the desk as the participant presses buttons.
Check to make sure the bottom row of lights on the button box interface light up when the corresponding buttons are pressed. Left-most light corresponds to the left most button (2BB) or the top button (4BB)
Check that the USB indicator on the button box interface is static (not blinking). A blinking USB status means the button box interface isn’t registering that it’s connected to a laptop/computer.
If the lights do not flash as buttons are pressed, something is wrong with the button box’s communication with the interface. Disconnect the trigger cable, make sure your task program is still closed, enter the scanner room, and reconnect the button box cable firmly.
Redo the configuration on the box under the desk and try again.
If the interface still does not react to the button presses, try a backup button box. There are spares in the drawer by the sink, beneath where the test magnet and thermometer are kept.
Warning
Do NOT bring the demo button box from the testing room into the scanner room. It is for practice only and NOT MR safe.
If nothing is working even with the new button box, contact CCN staff. The trigger or fiber optic cable may need replacing.
Trigger isn’t working
If your task also involves the button box, check the setup using the same steps in the previous section.
Replug the button box cable in the scanner room. This connection causes a lot of downstream problems, including with the trigger signal, if it is not firmly established.
If nothing is working, contact CCN staff. The trigger cable may need replacing.
Make sure what you’re noticing is not the typical lag time between the scan running and the movement data appearing on the tablet.
Double-click on the sequence on the console, click the “General” tab on the left of the window that pops up, and check that “+ BOLD” appears next to “Dot AddIn” at the bottom. This is required for your sequence to communicate with FIRMM.
I am trying to use FIRMMpix and the video isn’t playing
Make sure the HDMI cable is plugged into HDMI 2 on the AV box and the light to its right is turned on. The other end should be plugged into the HDMI port on the right side of the FIRMM tablet.
Press the Windows key and check the resolution: 1920 x 1080 at 60 Hz.
Make sure your task computer is connected to the Eyelink computer. This is typically done with the ethernet cable, so check that it is firmly connected and your network settings are configured to use it.
Check the tower under the eyetracker computer. The small, rectangular box on top of the tower should have the following cables connected to it:
Transducer cable with yellow tag plugged into the round, yellow port that says 12V@2A
Ethernet cable plugged into the rectangular port right next to transducer cable
Orange fiber optic cable plugged into a port on the long side of the box
If you still see nothing, restart the program. Quit Eyelink, check the cable connections on the tracker in the bore, then click the square button at the top left of the desktop screen to launch Eyelink again.
If nothing works, contact CCN staff. There may be another cable that isn’t plugged in or needs replacing.
Everything seems set up correctly, but there is a green “D” and green crosshairs (instead of white) during calibration
The eyetracker thinks it is detecting the left eye. We usually track the right eye because that is where the camera is typically and stably positioned–over where the right eye is visible through the coil.
To switch eyes, return to the main menu where you have the thresholding controls for pupil and CR. Look near the bottom of the screen–there are buttons for left and right eye in the “Eye Tracked” window. Click the “Right” button.
Now click the pupil to direct Eyelink to the area you know it should focus on. The participant view window may flash light blue and refuse to keep the yellow box centered around the pupil. If this happens, it means the CR thresholding is way off (likely due to the left/right confusion). Increase or decrease it until it starts to look sensible again and allows you to focus the yellow box around the pupil. Now adjust the pupil thresholding as usual and try calibration again.
If the Eyelink computer is alerting you to a filename error, check the ID you are using to identify your participant on your task laptop (or whichever computer you have connected to the Eyelink system). Make sure it is at most 8 characters long.
Eyelink runs on an old DOS system, which limits filenames to 8 characters or less. You can still register the participant on the console using whatever naming convention you’d like, but any string that will end up being used by Eyelink to save files will need to adhere to the character limit.
If there are no more blankets in the cabinet, spare linens are in the tall cabinet marked “Linens” by the corner desk in the back area of the suite. Many other spare supplies will be there, including scrubs and headphones mesh covers, in their respectively labelled cabinets.
Put used blankets in the linens bin (either the white one in the scanner room or brown, rectangular one by the phlebotomy room) at the end of your session.
Linens basket is full
When the linens basket is full, tie up the bag containing all the used linens and take it out into the main room. Leave it against the wall directly behind the sink.
If you leave it anywhere else, even close by, Facilities will not pick it up.
Fan is off or moved
There is a small fan that runs continuously in the room, on the floor between the coil rack and the counter. It is turned off for concurrent EEG-fMRI data collection. If you are not running one of those studies, and the air isn’t circulating well enough in the room, orient it toward the bed and turn it back on. Participants sometimes find it stuffy in the scanner and having this fan on can help.
If you notice that the fan has been significantly moved from its usual spot, notify CCN staff. Because the motor in the back contains weakly ferrous components, the fan is tied to the coil rack and weighed down with sandbags. It should never be far away from its usual position on the floor, so alert CCN if it is.