Hoffman2 Computing Cluster
Getting Started
1.1 Introduction
What is Hoffman?
The Hoffman2 Cluster is UCLA’s campus high-performance computing resource, maintained by the Institute for Digital Research and Education (IDRE). It provides computing and data-storage resources for research involving large datasets and computationally intensive analyses.
The Hoffman2 Cluster is named for Paul Hoffman (1947-2003) and sees tremendous usage, with 800+ 64-bit nodes and over 26,000 cores. Find out more at the Hoffman2 documentation homepage.
Anatomy of the Computing Cluster
What does Hoffman2 consist of?
Login Nodes
Computing Nodes
Storage Space
Univa Grid Engine
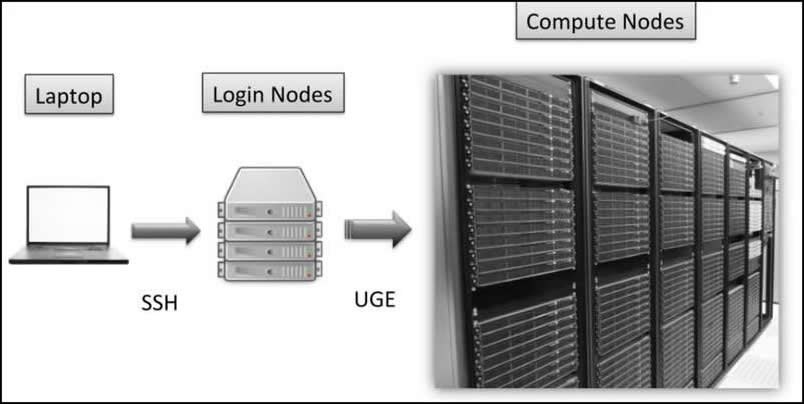
Login Nodes
There are four login nodes which allow you to access and interact with the Hoffman2 Cluster. These are essentially four dedicated computers that you can SSH into and use to look at and edit your files or submit computing jobs to the queue (more on what the queue is in a bit). It is important to remember that these are four computers being shared by ALL the Hoffman2 users. Doing ANY type of heavy computing on these nodes is frowned upon. If you are:
moving lots of files
calculating the inverse solution to an EEG signal, or
running a bunch of python scripts to extract tractography of a brain
You should NOT be doing this on a login node. If the sysadmins at ATS find any process that is taking up too many resources on the login nodes, they reserve the right to terminate the process immediately.
Computing Nodes
As of April 2014, Hoffman2 is made up of more than 12,000 processors across three data centers and this number continues to grow as the cluster is expanded. The individual cores of the processors are where your programs gets executed when you submit a job to the cluster. There are ways to request different amount of resources, such as how much RAM or CPU cores your program/job needs.
There is also a GPU cluster that has more than 300 nodes, but access to this must be requested separately from a normal Hoffman2 account.
The reason the number of computing cores continues to grow is because more resource groups (like individual research labs) join Hoffman2 and buy nodes to be integrated into the cluster. Nodes contributed by a resource group are guaranteed to that resource group and can be used to run longer jobs (up to 14 days). As of June 2013, the Cohen and Bookheimer groups on Hoffman2 have 96 cores:
- 6 nodes (installed pre 2010) each with
8 cores
8GB RAM
- 3 nodes (installed Fall 2012) each with
16 cores
48GB RAM
Use the command mygroup to see what resources you have available.
1.2 Getting an Account
Requesting Hoffman2 Account
What You Need: A UCLA Logon ID, available for free to any UCLA staff, student, or faculty member. If you do not have a UCLA Logon ID, head to the UCLA Logon services page. Click on “Create UCLA Logon ID”.
Applying for the Account
ATTENTION: If you are a PI interested in Hoffman2, please see the section Becoming a Faculty Sponsor below.
Navigate to the Requesting an account page.
Read over the application summary.
Click “New User Registration”.
Log in using your UCLA Logon ID and password.
Fill out the form with requested information.
Proposed Username This will be the username you use to sign into the cluster with.
Select a Resource
You can request access to any cluster that is a member of the Grid Portal.
Click Submit. You will receive an email with a link to a temporary password. Save the temporary password when you receive it. The link expires after 72 hours. If you missed the link or it expired, go back to the Application Page and click Forgot Your Cluster Password? It will take about a day for the cluster to resend you a new password.
You can change your password once you’ve logged in by using passwd.
Becoming A Faculty Sponsor
If you are a PI or Lab Manager interested in the Hoffman2 Cluster, you will want to create a Faculty Sponsor account first. Also, if you are a member of another lab collaborating with the Cohen or Bookheimer labs, you may want to forward this information to your PI or Lab Manager. Faculty Sponsors can approve (or deny) applications for membership to their group. They also receive a group folder and a unique group id so their users can work and share data easily with each other.
Navigate to the register as a sponsor page.
Click “New Sponsor Registration” (on the bottom of the page).
Log in using your UCLA Logon ID and password.
Fill out the form with appropriate information.
Under ‘Reason’, any reason is appropriate for faculty members. For example: “To perform fMRI analysis.”
1.3 Accessing the Cluster
SSH - Command Line
SSH stands for Secure Shell and is a method of remotely logging into a computer using an encrypted connection. It is a command-line tool and is available on most *nix-based operating systems with ports available for Windows.
Mac/Linux/Unix
Simple SSH
Use the ssh command from a terminal:
ssh login_id@hoffman2.idre.ucla.edu
where login_id is replaced by your cluster user name.
GUI-Enabled SSH
Macs (post - Snow Leopard 10.6.x) no longer come with an X Window System Server pre-installed.
Before doing the following steps, please install XQuartz and restart your computer. Note: From Xquartz 2.7.9, indirect GLX is disabled by default, so you’ll need to run this command followed by a reboot
ssh login_id@hoffman2.idre.ucla.edu
For M-series Macs use the following instead with XQuartz 2.8.2:
defaults write org.xquartz.X11 enable_iglx -bool true
Open up your Terminal. It’s under Applications > Utilities on Macs.
Type the command,
$ ssh -Y login_id@hoffman2.idre.ucla.edu
replacing login_id with your Hoffman2 username. The -Y is for X11 Forwarding so that any graphics that are rendered on Hoffman2 get forwarded to the screen of your computer.
Press enter and type in your password when it asks for it. No characters or asterisks will show up while you type.
Provided your typing was good, you will be greeted by the Hoffman2 login message and have successfully SSH into a login node.
Windows
Go here and follow the instructions under Windows. We recommend PuTTY or Cgywin.
2. If you use putty, please install xming for GUI access. Once you have that setup, the process is the same as if you were on a Mac or Linux/Unix machine
Remote Desktop [Recommended]
Currently, Hoffman supports connecting to the cluster via the X2Go client and the NoMachine client.
NX Client - GUI
The NX Client program allows you to set up a Virtual Network Computing (VNC)-like session with Hoffman2. This session will keep running even if your Internet connection drops in and out (much like screen on the command line).
X2Go - GUI
X2Go provides a desktop-like GUI for accessing the Hoffman server. Please see here to find out more about setup details.
Change Passwords
Once you’ve logged on and made sure its works, you can change your password to something more rememberable To change passwords, logon and type:
passwd
It should ask you for your old password and then new ones.
1.4 Working in a Linux Environment
A tutorial from Hoffman2 support
Here is a simple tutorial from Hoffman2’s support page
Permissions
Permissions determine who and to what degree users can access a file.
The key terminology and function of the permission system is found here: UNIX Permissions
List of Utilities Covered
ls
chmod (man chmod)
Exhaustive tutorial including min-quizzes CatCode Tutorial
chgrp
umask
newgrp
File & Shell Management
This is where your career on a UNIX type system can be made or crippled. Sure you know how to move around, list files, find out where you are, and display the contents of files. But now you have to do something with those files. And let’s face it, there are a whole lot of files.
It is highly recommended that the reader look over Tutorial Four on how to use wildcards for matching before preceding with this section.
The good news is, using the above utilities we just learned about we can accomplish almost anything we want to do using a very handy utility called find.
As the name might imply, find, well, finds things. What it finds is up to you. find has many, many options. All laid out in its man page. However, for most purposes only a few are needed. We’ll cover those here.
A basic find command looks like
$ find /path/to/directory -name 'filename.txt'
This command looks at all files in /path/to/directory and in all directories therein for a file named ‘filename.txt’.
Common Options
-typeSpecifies the type of file we’re looking for. e.g. text file, directory, link, etc.
-nameSpecifies the name of the file. Case Sensitive
-inameSpecifies the name of the file. Case Insensitive
-orJoins the precedeing and following terms by the boolean OR
-andJoins the preceding and following terms by the boolean AND
-notnegates the next term. e.g. -not -empty means “is not empty”
-execexcutes a shell command for each file found. The only ‘trick’ is to replace the actual file name with {} and end the command with a ;. This should become clear when reviewing the examples below.
-emptyThe file or directory is empty.
We can combine the above options to preform complex searches on the file system and, even better, execute commands on those search terms. For a list of all options and their arguments, please see Find Man Page.
Examples
Find all directories named ‘tsplot’ in the current directory
$ find . -name tsplot -type d
Find all empty directories in the directory /u/home9/foo/data
$ find /u/home9/foo/data -empty
Find all empty files or directories named ‘tsplot’ in the current directory
$ find . -name tsplot -or -type d -empty
Using commands we’ve already learned to perform actions on the above.
Find all files named design.fsf and look for a subject named ‘foo’
$ find . -name design.fsf -type f -exec grep "foo" {} \;
With a little reading of the man page, we find a new option called -user, which finds all files that belong to the specified user
Find all files owned by user ‘foo’ and change their permissions
$ find . -type f -user foo -exec chmod -R ug+rwX {} \;
Environment Variables
UNIX uses environment variables to pass information to various tools during a session. These variables are named in all capitals by convention. You can see all of the environment variables and their values by using the command
$ env
To simply see the value of one variable, you can echo its value
$ echo $VARIABLENAME
There are a few environment variables that you should be familiar with…
USER
This has the username of the current user, which should usually be you. See what the value is
$ echo $USER
HOME
This is the path to the home directory of the current user. The tilde symbol (~) is also recognized as shorthand for this home directory.
$ echo $HOME
PATH
This is a list of directories, separated by colons, in which the operating system should check for commands that you type. For instance, when you were using the ls, grep, or find commands in previous tutorials, the operating system started looking through the directories in your PATH variable to find the first command that matched that name and tried executing it. See the directories that the operating system will check for you by typing
Making additions to this variable can be important. Let’s say you have a personal set of scripts you have created and you store them in a directory ~/scripts. Every time you want to use one of those scripts, you have to type out the full path to it
$ ~/scripts/my-first-script.sh
or
$ $HOME/scripts/my-first-script.sh
This can get tiring. If you added your scripts directory to your path, you wouldn’t have to type that extra bit every time. The best way to do this would be to edit your Bash Profile with a text editor. e.g.
$ vim ~/.bash_profile
and add the line
export PATH=$PATH:~/scripts
to the end of the file and saved it. This will “export” the variable named PATH to the environment and set its value equal to whatever was already in PATH plus the directory ~/scripts. The next time you login, you can do
$ echo $PATH
and see that at the end of the list of directories to search, your directory ~/scripts has been added. Now you can be anywhere in the filesystem and call the command
$ my-first-script.sh
to run that same script from before.
Collisions on the PATH
If you get in the habit of naming your scripts the same thing (e.g. my-script.sh) and placing them in different directories, you may run into a collision on your PATH. This is a case where you think you are running one script, but the operating system is actually running another. Let’s look at an example.
Continuing from the previous example where we have the script ~/scripts/my-first-script.sh, let’s say that we make another directory called analyze and we are working with some data there and make a processing script coincidentally called my-first-script.sh. So we have the files
~/scripts/my-first-script.sh
~/analyze/my-first-script.sh
~/analyze/data-file-1
~/analyze/data-file-2
...
And we have amended our .bash_profile so that ~/scripts is at the end of our PATH environment variable.
If we change to the analyze directory
$ cd ~/analyze
and wish to run the processing script my-first-script.sh on the data, you may think we can execute
$ my-first-script.sh
and call it a day. But this will actually run the file ~/scripts/my-first-script.sh because it is the first file the operating system found in the directories of PATH that matched that name. If you wanted to verify this, you can execute
$ which my-first-script.sh
This command will search your PATH variable for the first instance of my-first-script.sh and return the full path to it, something like this
~/scripts/my-first-script.sh
To run the script we had intended, we would need to execute
$ ./my-first-script.sh
The period and slash specify that the operating system should look in the current directory for this script.
If something seems weird or script isn’t working, a good starting point is to check that you are running the script you think you are. Use which to find out
Man Pages
The man pages (for “manual”) are the be all end all reference on UNIX systems.
A Beginners’ Guide to man Pages is an excellent introduction into how to move around a man page easily and understand what it’s telling you.
1.5 Quotas
Users and groups of users on Hoffman2 only have access to a predefined amount of disk space and number of files. Keep yourself apprised of how much data you are using with these tools.
Personal Quotas
$ myquota
Returns information about how much disk space you are using and how many files you have.
$ myquota -u [USERNAME]
Returns information about how much disk space another user is using.
Group Quotas
$ myquota -g [GROUPNAME]
Returns information about how much space you and everyone in your group are using on Hoffman2.
1.6 Modules
1.7 Changing Passwords
Use the passwd command to change password. It will prompt you for your old password, and then the new password.
$ passwd
Changing password for user joebruin.
Please enter your current password:
Please enter your new password:
1.8 Password-less ssh Login
1.9 Getting Support
When opening a support ticket with IDRE team, you can choose “Group Support” then choose “CCN (Hoffman2)“. This will redirect the questions to us. In that way we can support you on items such as MRI software or computing questions with CCN supported applications.
In case you want to send a direct ticket to IDRE team, please choose other categories that match your question. Once the ticket is open, you will receive an email. If you still want us to be a part of this ticket, please reply to this ticket and cc to Haiyan and Jonathan’s email address.
Computing
2.1 Software Tools
There is a CCN usergroup on Hoffman2 which is maintained for groups doing Neuroimaging work at UCLA. Tools like FSL, FreeSurfer, AFNI and Nibabel are maintained for this group separate from normal Hoffman2 programs. In order to take advantage of these tools, you need to load the modules into the interactive mode or listed in your batch mode scripts.
module load appname/version
Below is a list of the available software tools. We will do our best to update it as changes are made.
Do not load matlab and freesurfer or matlab and RStudio as it will cause errors.
2.1.1 AFNI
Version |
Install Date |
Notes |
|---|---|---|
20.1.00 |
New |
|
19.0.15 |
2019.02.20 |
|
17.2.07 |
2017.02.07 |
Default |
16.3.1 |
2016.11.20 |
|
2011.12.21.1014 |
2012.03.19 |
2.1.2 ANTS
Version |
Install Date |
Notes |
|---|---|---|
ants-2.3.1 |
New |
|
ants-2.2.0 |
2019.03.25 |
|
ants-2.1.0-redhat |
2015.01.23 |
Default |
2.1.3 ASHS
Version |
Install Date |
Notes |
|---|---|---|
20180720 |
2018.07.20 |
New |
2017-02 |
2017.06.08 |
|
Rev-103 |
2016.02.24 |
Default |
2.1.4 Brainsuite
Version |
Install Date |
Notes |
|---|---|---|
20180720 |
2018.07.20 |
New |
2017-02 |
2017.06.08 |
|
Rev-103 |
2016.02.24 |
Default |
2.1.5 BrainAgeR
Version |
Install Date |
Notes |
|---|---|---|
19a |
2019.02.19 |
Default |
18a |
||
17a |
||
15c |
No longer supported |
2.1.6 brms
R Library Official Website
Version |
Install Date |
Notes |
|---|---|---|
2.17.0 |
2022.06.10 |
Default |
2.1.7 Caret
Version |
Install Date |
Notes |
|---|---|---|
5.65 (2012.01.27) |
2013.07.15 |
Default, not folded into the main profile |
2.1.8 ccn_py37
Conda virtual environment with nibabel, nilearn, pydicom, pandas, scikit-learn, scipy
Version |
Install Date |
Notes |
|---|---|---|
1.0 |
2021.05.24 |
CentOS 7 with Conda |
2.1.9 Chronux
Version |
Install Date |
Notes |
|---|---|---|
2.1 |
2013.02.26 |
Current |
2.1.10 CONN
Version |
Install Date |
Notes |
|---|---|---|
19.b |
2013.02.26 |
New |
18.b |
||
17.f |
Default |
2.1.11 dcm2nii
Version |
Install Date |
Notes |
|---|---|---|
2013.06.06 |
2014.03.06 |
|
2011.11.11 |
circa 2011 |
Current |
2.1.12 dmctk
Version |
Install Date |
Notes |
|---|---|---|
3.6.0 |
2017.05.17 |
Current |
3.6.6 |
2021.02.16 |
2.1.13 DTIprep
Version |
Install Date |
Notes |
|---|---|---|
1.2.4 |
2017.12.21 |
|
1.2.9 |
2018.03.20 |
Current |
2.1.14 DSI Studio
Please note DSI studio only works with NoMachine
Version |
Install Date |
Notes |
|---|---|---|
“Chen” Release |
2023.07.06 |
Current |
2.1.15 dmriprep
Version |
Install Date |
Notes |
|---|---|---|
0.4.0 |
2020.12.10 |
Current |
2.1.16 EEGLAB
Version |
Install Date |
Notes |
|---|---|---|
13.1.1b |
2014.01.29 |
|
12.0.2.5b |
2013.11.14 |
|
11.0.5.4b |
2013.11.14 |
|
12.0.0.0b |
2012.12.10 |
|
11.0.0.0b |
2012.02.21 |
|
10.2.5.8b |
2012.02.21 |
2.1.17 ENIGMA
Version |
Install Date |
Notes |
|---|---|---|
20210422 |
2021.04.22 |
Current |
2.1.18 ENIGMA HALFpipe
Version |
Install Date |
Notes |
|---|---|---|
1.1.1 |
2021.08.27 |
Current |
2.1.19 FastSurfer
Version |
Install Date |
Notes |
|---|---|---|
202102 |
2021.03.01 |
Current |
2.1.20 FIT
Version |
Install Date |
Notes |
|---|---|---|
FITv2.0d |
2021.03.01 |
|
FITv2.0e |
2021.01.13 |
2.1.21 FIX
Version |
Install Date |
Notes |
|---|---|---|
1.06.15 |
2021.12.01 |
2.1.22 FMRIprep
Version |
Install Date |
Notes |
|---|---|---|
25.1.3 |
2025.07.27 |
In Apptainer |
24.1.1 |
2024.11.01 |
In Apptainer |
23.2.0 |
2024.03.12 |
In Apptainer |
23.1.3 |
2023.08.22 |
Use Apptainer module |
20.2.1 |
2021.05.13 |
In Singularity |
20.2.0rc0 |
||
20.1.1 |
|
|
1.4.0 |
2019.01.11 |
Default * known Issue |
1.3.2 |
2019.01.11 |
|
2.1.23 FreeSurfer
Version |
Install Date |
Notes |
|---|---|---|
7.2.0 |
2021.11.29 |
|
7.1.1 |
2021.02.26 |
|
6.0.0 |
2017.01.18 |
CentOS 6 only |
2.1.24 FSL
Version |
Install Date |
Notes |
|---|---|---|
6.0.4 |
2021.01.25 |
new |
6.0.3 |
2021.09.30 |
|
6.0.1 |
2019.03.01 |
|
6.0.0 |
2018.10.23 |
|
5.0.11 |
2018.03.19 |
|
5.0.10 |
2017.04.24 |
|
5.0.9 |
2015.10.02 |
Default |
5.0.8 |
2014.12.03 |
|
5.0.7 |
2013.10.17 |
|
5.0.6 |
2013.12.18 |
(2013.12.18-2014.10.10) |
4.1.9 |
2011.12.01 |
|
4.0.4 |
circa 2008 |
Known issue: 5.0.10 fsleyes crash on x2go
2.1.25 FSL_MRS
Version |
Install Date |
Notes |
|---|---|---|
2.1.12 |
2023.08.22 |
new |
2.1.26 ggseg
Version |
Install Date |
Notes |
|---|---|---|
v1.6.5.9000 |
2023.03.1 |
*Note: ggsegExtra and ggseg3d are also available under these libraries
2.1.27 gift
Version |
Install Date |
Notes |
|---|---|---|
GroupICATv4.0b |
2017.11.14 |
|
GroupICATv4.0c |
2021.01.04 |
2.1.28 gradunwarp
2.1.29 HCP Benchwork
Note: module name: hcp
Version |
Install Date |
Notes |
|---|---|---|
1.3.2 |
2019.05.22 |
New |
1.2.3 |
2018.02.13 |
|
1.1.1 |
2016.02.18 |
Default |
1.0 |
||
0.84 |
2.1.30 ICA-AROMA
Note: Python 2.7 available for v0.4.5, module name: ica-aroma_py27
Version |
Install Date |
Notes |
|---|---|---|
0.4.5 |
New |
|
0.4.1-beta |
Default |
2.1.31 ITK Gray
Version |
Install Date |
Notes |
|---|---|---|
080803 |
2009.11.19 |
Default |
080128 |
2009.11.13 |
2.1.32 ITKSnap
Version |
Install Date |
Notes |
|---|---|---|
3.4.0.QT4 |
2016.02.24 |
Default |
3.6.0.QT4 |
2021.03.02 |
|
3.8.0.QT4 |
2021.03.02 |
Default |
2.1.33 kwave
Version |
Install Date |
Notes |
|---|---|---|
1.3 |
2020.07.20 |
Current |
2.1.34 MANGO
Version |
Install Date |
Notes |
|---|---|---|
20190905 |
Current |
2.1.35 MRIQC
Version |
Install Date |
Notes |
|---|---|---|
0.16.1 |
2021.03.08 |
Current |
2.1.36 NDATools
Version |
Install Date |
Notes |
|---|---|---|
0.2.3 |
2021.03.04 |
Current |
2.1.37 OpenSmile
Version |
Install Date |
Notes |
|---|---|---|
3.0.0 |
2021.03.23 |
Current |
2.1.38 Osprey
Version |
Install Date |
Notes |
|---|---|---|
2.9.6 |
2025.03.13 |
Current |
2.1.39 Profumo
Version |
Install Date |
Notes |
|---|---|---|
0.11.3 |
2021.06.22 |
Current |
2.1.40 RATS
Version |
Install Date |
Notes |
|---|---|---|
060419 |
2019.06.04 |
Current |
2.1.41 Simnibs
Version |
Install Date |
Notes |
|---|---|---|
060419 |
2019.06.04 |
Current |
2.1.42 RStan
Version |
Install Date |
Notes |
|---|---|---|
4.1.2 |
2022.04.11 |
Current |
2.1.43 SPM
Version |
Last Patch Applied |
Last Checked Date |
Notes |
|---|---|---|---|
SPM12-standalone |
Current |
||
SPM12 |
|||
SPM8 |
5236 |
2014.01 |
|
SPM5 |
Unknown |
N/A |
No longer supported |
2.1.44 TrackVis/Diffusion Toolkit
Official Website 1 Official Website 2
Tool |
Version Number |
Last Checked Date |
Notes |
|---|---|---|---|
TrackVis |
0.5.2.2 |
2014.03.06 |
|
Diffusion Toolkit |
0.6.2.2 |
204.03.06 |
2.1.45 WEKA
Version |
Install Date |
Notes |
|---|---|---|
3.8.1 |
||
3.7.10 |
2014.03.03 |
|
3.6.5 |
circa 2011.08 |
2.2 Run Your Jobs
2.2.1 Hoffman 2: Interactive Sessions
Interactive sessions on Hoffman2 let you have access to a computing node for up to 24 hours. This is ideal for:
running a intensive program like MATLAB (in fact that’s how it works), WEKA, R or FSLView
debugging a script you will be submitting to the queue later
moving/tar’ing/untar’ing lots of files
any other computing or graphics intensive operations since you aren’t supposed to use the login nodes for such heavy lifting.
Basic Command
To get one, just use the qrsh command.
For example:
$ qrsh
will try to get you an interactive node with 1 core 1 GB memory, for two hours.
If you successfully get a node, your prompt will change from something like
[joebruin@login4 ~] $
to something like
[joebruin@n1234 ~] $
indicating you are on node 1234.
Longer Time
If you wanted to specify a a time limit for your interactive session (anything less than 24 hours), use the resource flag again and specify time in the HH:MM:SS format.
For example:
$ qrsh -l h_rt=4:00:00
will try securing an interactive node for four hours with the default amount of RAM, but if they are all taken you will be kindly told you are out of luck.
Use highp for 24+ hours job
If you need to run a very long job over 24 hours, and you are a CCN member, you can use “highp” flag to choose CCN dedicated nodes.
$ qrsh -l h_rt=48:00:00,highp
will reserve an interactive job for 48 hours in CCN’s dedicated nodes (without “highp”, the job will never start). Since CCN has limited nodes (12 for now), the waiting time for getting the resource might take some time when the nodes are all busy. It may take less time to start a job which requires less than 24 hour in the regular Hoffman pool. So please use highp for jobs longer than 24 hours only.
More memory
Doing something memory intensive? Like working with a lot of visualizations or multiple datasets? Use the resource flag again and specify a data request.
For example
$ qrsh -l h_rt=4:00:00,h_data=4G
will try securing an interactive node for four hours with four gigabytes of RAM, but if no such node is available the cluster will deny your request.
$ qrsh -l h_rt=48:00:00,highp,h_data=4G
specify memory usage with highp
More computing power
You can add more processor cores to power up your computing intensive jobs
$ qrsh -l h_rt=4:00:00,h_data=4G -pe shared 2
This will reserve 2 processor cores for the interactive mode session. Be aware that the memory reserved here will be 2 x 4G = 8G.
Request node with specific processor architect
You can choose processor architect, for example request a work node with intel chip only
$ qrsh -l arch=intel*,h_rt=4:00:00,h_data=8G
Tips
Sometimes inactivity on your computer will result in Hoffman2 connection break [ Broken Pipe ] (even while computing).
To prevent this from happening: For Macs - in your /etc/ssh/ssh_config -add this line to the bottom
ServerAliveInterval 180
This will tell your ssh to ping the server every 180 seconds to prevent it from timing out.
2.2.2 Hoffman2: Batch Mode
Here we show how you can submit your job with batch mode.
To use a batch job, you need to create a batch file with bash or tcsh. This file should have three parts:
Part 1: List all the resources you want to reserve for your job
Part 2: Load your modules, export the Linux environment that is needed for your script to run
Part 3: Call your job script
Once you have your batch file, you can submit it using the qsub command. For example (if your batch file is named as myjob.sh)
qsub myjob.sh
Job Submission Templates
Below are some batch file templates you can start with. To work with these example scripts:
Copy the contents of the script template into a new script, e.g.
myscript.sh.Watch out for line ending errors caused by copying/pasting from a Mac or PC. Line ending issues can be fixed withdos2unix myscript.sh.Edit the “preamble” content at the top to adjust the memory (h_data) and run time (h_rt).
For jobs longer than 24 hours, you must specify the ‘highp’ option, e.g.
-l h_rt=36:00:00,h_data=4G,highpYou can also adjust the number of cores: 2 cores is ‘-pe shared 2’. I recommend 2, 4, or 8 for this value. Be aware that the number of cores is a multiplier for the RAM. h_data=4G and 2 cores is 8G total.
Edit the mail notification options: ‘-m bea’ means you want to receive a message when your job Begins, Ends, or Aborts (quits due to an error). You may use any combination of ‘b’, ‘e’, and ‘a’ for this setting.
Put your script content at the bottom.
Submit directly to the job scheduler like this:
qsub myscript.sh
Submit job: Example script for submitting a single job
#!/bin/bash
#$ -cwd
# error = Merged with joblog
#$ -o joblog.$JOB_ID
#$ -j y
#$ -pe shared 2
#$ -l h_rt=8:00:00,h_data=4G
# Email address to notify
#$ -M $USER@mail
# Notify when
#$ -m bea

# load the job environment:
. /u/local/Modules/default/init/modules.sh
module use /u/project/CCN/apps/modulefiles

# Load the FSL module
module load fsl

# This is optional
# More info here: https://www.ccn.ucla.edu/wiki/index.php/Hoffman2:FSL
export NO_FSL_JOBS=true

# Your script content goes here...
Submit job (tcsh): Same as above, written for tcsh
#!/bin/tcsh
#$ -cwd
# error = Merged with joblog
#$ -o joblog.$JOB_ID
#$ -j y
#$ -pe shared 2
#$ -l h_rt=8:00:00,h_data=4G
# Email address to notify
#$ -M $USER@mail
# Notify when
#$ -m bea

# Load the job environment:
source /u/local/Modules/default/init/modules.csh
module use /u/project/CCN/apps/modulefiles

# Load the FSL module
module load fsl

# This is optional
# More info here: https://www.ccn.ucla.edu/wiki/index.php/Hoffman2:FSL
setenv NO_FSL_JOBS true

# Your script content goes here...
Submit jobarray: Example script for submitting a jobarray with hard-coded array values
#!/bin/bash
#$ -cwd
# error = Merged with joblog
#$ -o joblog.$JOB_ID.$TASK_ID
#$ -j y
#$ -pe shared 2
#$ -l h_rt=8:00:00,h_data=4G
# Email address to notify
#$ -M $USER@mail
# Notify when
#$ -m a
#  Job array indexes
#$ -t 1-5:1

# Load the job environment:
. /u/local/Modules/default/init/modules.sh
module use /u/project/CCN/apps/modulefiles

# Load the FSL module
module load fsl

# This is optional
# More info here: https://www.ccn.ucla.edu/wiki/index.php/Hoffman2:FSL
export NO_FSL_JOBS=true

# Set up the subjects list
declare -a subjects

subjects[1]="su3v3hkaykw2"
subjects[2]="wxg5mk5u5xbz"
subjects[3]="6q2bgkqu5grp"
subjects[4]="whjue68jmwyh"
subjects[5]="pfx3ju9wz8rr"

echo "This is sub-job $SGE_TASK_ID"
echo "This is subject ${subjects[$SGE_TASK_ID]}"

# Your script content goes here...
Submit jobarray (readarray): Example script for submitting a jobarray with an array read in from a file, e.g., ‘subjects.txt’
In this example, subjects are read in from a subjects.txt file. subjects.txt is a text file with a single subject ID on each line. Watch out for line ending errors caused by copying/pasting from a Mac or PC. Line ending issues can be fixed with dos2unix subjects.txt.
#!/bin/bash
#$ -cwd
# error = Merged with joblog
#$ -o joblog.$JOB_ID.$TASK_ID
#$ -j y
#$ -pe shared 2
#$ -l h_rt=8:00:00,h_data=4G
# Email address to notify
#$ -M $USER@mail
# Notify when
#$ -m a
#  Job array indexes
#$ -t 1-16:1

# Load the job environment:
. /u/local/Modules/default/init/modules.sh
module use /u/project/CCN/apps/modulefiles

# Load the FSL module
module load fsl

# This is optional
# More info here: https://www.ccn.ucla.edu/wiki/index.php/Hoffman2:FSL
export NO_FSL_JOBS=true

# Set up the subjects list
readarray -t subjects < subjects.txt
(( i=$SGE_TASK_ID - 1 ))

echo "This is sub-job $SGE_TASK_ID"
echo "This is subject ${subjects[$i]}"

# Your script content goes here...
Part 1: Request Computing Resources
This example is based on code from the Submit Job template.
The first part of the batch script file should let the Hoffman job scheduler know what resources you want to reserve for your job:
#!/bin/bash
#$ -cwd
#$ -o joblog.$JOB_ID
#$ -j y
#$ -pe shared 2
#$ -l h_rt=8:00:00,h_data=4G
#$ -M $USER@mail
#$ -m bea
Here’s the meaning of each line:
#$ -cwd
Use the current directory for the job
#$ -o joblog.$JOB_ID
Write standard output to file joblog.$JOB_ID. $JOB_ID will be replaced by your job ID which is assigned once you submit your job.
#$ -j y
Merge error log with standard output (in file joblog.$JOB_ID)
#$ -pe shared 2
Request 2 processor cores
#$ -l h_rt=8:00:00,h_data=4G
Use -l option to specify job running time length and reserve memory
h_rt=8:00:00 : reserve 8 hours for your job running time
h_data=4G: reserve 4G per-core (since -pe 2 is used above, it will reserve 2 core x 4G memory = 8G total memory)
#$ -M $USER@mail
Send notification to your user email address
#$ -m bea
Specify the timing of the notification email to be sent out:
b - when the job begins
e - when the job ends
a - when the job is aborted (ends in an error state)
Part 2: Setup the Environment
In the second part of the batch script, you should setup your Unix environment for your code to run, which includes loading modules and export paths for libraries.
To use any module provided by Hoffman and CCN, you’ll need the following two lines
# load the job environment:
. /u/local/Modules/default/init/modules.sh
module use /u/project/CCN/apps/modulefiles
For example, load FSL
# Load the FSL module
module load fsl
Another example, export a FSL variable
# This is optional
# More info here: https://www.ccn.ucla.edu/wiki/index.php/Hoffman2:FSL
export NO_FSL_JOBS=true
Or export an additional PATH for a custom installed library under your .local/ directory
export PATH=$HOME/.local/bin:$PATH
Part 3: Call your job script
The third part of the batch script should call commands or other scrip for analysis.
For example, if you run feat
feat /my/path/to/design.fsf
Or if you have a script named as mycode.sh containing all the commands for your analysis,
Make sure your job script has executive privileges by using chmod command
chmod ug+x mycode.sh
call your script at the last part of your batch script
For example:
/bin/bash mycode.sh
Once the batch script is ready, you can submit it with qsub
qsub myjob.sh
To confirm the status of the submitted job, use command “myjob”
myjob
This will show the status of your jobs.
Other methods
Use an interactive way to create your batch job file in Hoffman, read more about job.q Use qsub in one line command: examples
2.2.3 Job Array
Job array is a type of batch mode. It makes it possible to process different subjects using the same script on multiple Hoffman2 working nodes at the same time.
Here, we use the this template code to show how it can be done:
#!/bin/bash
#$ -cwd
# error = Merged with joblog
#$ -o joblog.$JOB_ID.$TASK_ID
#$ -j y
#$ -pe shared 2
#$ -l h_rt=8:00:00,h_data=4G
# Email address to notify
#$ -M $USER@mail
# Notify when
#$ -m a
#  Job array indexes
#$ -t 1-5:1
The only differences comparing with the single subject version are:
#$ -o joblog.$JOB_ID.$TASK_ID
#$ -t 1-5:1
-o joblog.$JOB_ID.$TASK_ID is for splitting logs into separate files for each subject with file name joblog.$JOB_ID.$TASK_ID.
-t 1-5:1 is giving numbers [1 2 3 4 5] to step through.
This -t option should be followed by a lower number and a higher number range together with the step interval in the following format:
-t lower-upper:interval
where
lower is replaced with the starting number
upper is replaced with the ending number
interval is replaced with the step interval
So adding the argument
-t 10-100:5
will step through the numbers 10, 15, 20, 25, …, 100 submitting a job for each one.
There will be an environment variable called SGE_TASK_ID whose value will be incremented over the range you specified. Hoffman2 job scheduler will submit one job for each SGE_TASK_ID, so your work will be parallelized.
When to use it?
Let’s see how job array can replace a loop which is limited to run only in one computing node.
#!/bin/bash
# myFuncSlowWrapper.sh
for i in {1..100};
do
    myFunc.sh $i;
done
With job arrays, the work load will be split among many processors and can finish much faster. Here’s how you rewrite it using job array in myFuncFastWrapper.sh as
#!/bin/bash
# myFuncFastWrapper.sh
echo $SGE_TASK_ID
myFunc.sh $SGE_TASK_ID
Example
In this sample code, each SGE_TASK_ID is the index of the array of subjects, so each job in different node knows which subject it should process.
#!/bin/bash
#$ -cwd
# error = Merged with joblog
...
...
# Set up the subjects list
declare -a subjects

subjects[1]="su3v3hkaykw2"
subjects[2]="wxg5mk5u5xbz"
subjects[3]="6q2bgkqu5grp"
subjects[4]="whjue68jmwyh"
subjects[5]="pfx3ju9wz8rr"

echo "This is sub-job $SGE_TASK_ID"
echo "This is subject ${subjects[$SGE_TASK_ID]}"
At the end, call your script to process the subject
# Your script content goes here...
myFunc.sh  ${subjects[$SGE_TASK_ID]}
2.3 Monitoring Jobs
Software
3.1 MATLAB
3.2 R
3.3 WEKA
3.4 FSL
FSL is a comprehensive library of analysis tools for FMRI, MRI and DTI brain imaging data. FSL is written mainly by members of the Analysis Group, FMRIB, Oxford, UK.
Multiple versions are maintained on the Hoffman2 cluster to allow researchers to be consistent in using the same version for data analysis within a single study. You can either:
do nothing, and always use the “current” version of FSL on the cluster
actively choose which version of FSL you would like to run
We recommend the latter for data integrity and reproducibility.
3.4.1 FSL GUI
Make sure you source the FMRI Path in your Profile before doing anything, or else you won’t be able to access FSL.
To run FSL using a GUI on hoffman2, use the following command:
$ fsl &
If you received this message while opening FSL
DISPLAY is not set. Please set your DISPLAY environment variable!
It means you did not open X11 along with your ssh connection. See Accessing the Cluster for more information.
3.4.2 FSL Tools
A complete list of tools can be found here.
Functional MRI (command line only)
Tool |
Explanation |
|---|---|
Model-based FMRI analysis: data preprocessing (including MCFLIRT motion correction); first-level FILM GLM timeseries analysis; higher-level FLAME Bayesian mixed effects analysis. |
|
Model-free FMRI analysis using Probabilistic Independent Component Analysis (PICA). MELODIC automatically estimates the number of interesting noise and signal sources in the data and because of the associated “noise model”, is able to assign significance (“p-values”) to the output spatial maps. MELODIC can also analyse multiple subjects or sessions simultaneously using Tensor-ICA. |
|
Fast ASL & BOLD Bayesian Estimation Routine. Efficient nonlinear modelling and estimation of BOLD and CBF from dual-echo ASL data, using Variational Bayes. |
Structural MRI (command line only)
Tool |
Explanation |
|---|---|
Brain Extraction Tool - segments brain from non-brain in structural and functional data, and models skull and scalp surfaces. |
|
FMRIB’s Automated Segmentation Tool - brain segmentation (into different tissue types) and bias field correction. |
|
first FMRIB’s Integrated Registration and Segmentation Tool. FIRST uses mesh models trained with a large amount of rich hand-segmented training data to segment subcortical brain structures. |
GUI Commands/Tools [Make sure to have X11 forwarding on]
Tool |
Explanation |
|---|---|
fsl |
Bring you to the FSL menu where you can choose what type of analysis. |
FMRIB’s Diffusion Toolbox - tools for low-level diffusion parameter reconstruction and probabilistic tractography, including crossing-fibre modelling. |
|
FMRIB’s Linear Image Registration Tool - linear inter- and intra-modal registration. |
|
Model-based FMRI analysis: data preprocessing (including MCFLIRT motion correction); first-level FILM GLM timeseries analysis; higher-level FLAME Bayesian mixed effects analysis. |
|
A program which allows you to interrogate FEAT results by defining a mask or set of co-ordinates (in standard-space, highres-space or loweres-space) and get mean stats values and time-series. |
|
Glm |
A GUI for setting up just the design matrix and contrasts, in the same way as in FEAT, for use with other modelling/inference programs such as randomise. |
Model-free FMRI analysis using Probabilistic Independent Component Analysis (PICA). MELODIC automatically estimates the number of interesting noise and signal sources in the data and because of the associated “noise model”, is able to assign significance (“p-values”) to the output spatial maps. MELODIC can also analyse multiple subjects or sessions simultaneously using Tensor-ICA. |
|
Physics-Oriented Simulated Scanner for Understanding MRI. An FMRI data simulator that produces realistic simulated images and FMRI time series given a gradient echo pulse sequence, a segmented object with known tissue parameters, and a motion sequence. |
|
Renderhighres |
Transforms all thresholded stats images in a FEAT directory into high resolution or standard space and overlays these onto the high resolution or standard space images. This then produces PNG format pictures of the overlays and, by default, deletes the 3D AVW colour overlay images. |
This tool allows you to combine a background image (raw FMRI or high resolution MRI) image with one or two statistics images. The statistics image(s) must be in registration with the background image. |
|
Nonlinear noise reduction. |
|
Interactive display tool for 3D and 4D data. |
3.4.3 Cluster
Scripts that self-submit:
GUIs that self-submit:
3.4.4 NO_FSL_JOBS
Sometimes FSL doesn’t know how to allocate enough resources for its jobs properly. Specifically we have found the FEAT tool often unable to do this for group analyses or other complex tasks. So we did some tinkering with FSL to allow you to override its job submission on Hoffman2 and run it like it was just on your laptop. The trick is to set ``NO_FSL_JOBS=true`` in your environment and FSL will not submit jobs.
Interactive Session
If you want to watch FEAT run (kinda like paint drying, but to each their own), you can do the following
SSH into the cluster
Check out an interactive node with the necessary time and memory
qrsh -l h_rt=3:00:00,h_data=4GSet the environment variable
export NO_FSL_JOBS=true
4. Run your FSL commands. This means not using qsub, or command files, but simply executing the FSL command The commands will just run and not submit any jobs.
Submitting a Job
If you don’t want to watch FEAT run (why would you?), you can do the following
Create a shell script (e.g. myshellscript.sh) with the following contents
#!/bin/bash
export NO_FSL_JOBS=true
feat design.fsf
# any other FSL commands you want
And make sure to run chmod 750 to make the script executable
chmod 750 myshellscript.sh
Submit the shell script as a job but with the adequate time and memory allocations
qsub -l h_rt=23:00:00,h_data=4G -V -m bea -cwd /path/to/myshellscript.sh
And the FSL commands will be sent into the queue to run with your time and memory constraints rather than FSL’s. This may take some playing with to get the time and memory allocations correct, but at least you have the ability to tweak them.
3.4.5 FSL GPU
Some FSL tools, like eddy and bedpostx, can utilize Hofmman’s GPU architecture to speed up their processing times. Below is an example of how to request a CUDA 9.1-enabled GPU node.
# request Tesla P4 GPU node
qrsh -l gpu,P4,h_rt=5:00:00

module load cuda/9.1
module load fsl/6.0.4
export NO_FSL_JOBS=true

# now run eddy_cuda9.1 or bedpostx_gpu
3.4.6 Known Issue in Hoffman
When using NoMachine with newer version (6.0.7.x) of FSL, user might get errors such as the following:
"Unable to contact" settings server : Failed to connect to socket /tmp/dbus-xxxxx: Connection refused
This is because these versions of FSL overwrite the path to the dbus and noMachine cannot find the dbus in Hoffman.
Normally dbus-launch should be under /usr/bin. If it’s not, then it won’t work. By checking the dbu-launch path, it can be decided if it’s the same issue or not.
which dbus-launch
/usr/bin/dbus-launch
Solution:
1. check your ~/.bashrc or ~/.bash_profile, if there's any "module load FSL", comment them out.

2. Start noMachine

3. In noMachine terminal, input "module load fsl/versionxxx". Then it should avoid the same error this time.
3.5 Python
3.6 Jupyter Notebook
3.7 Singularity
3.8 Git
3.9 X2Go
X2Go provides a desktop GUI for users connecting to a Linux server
Download X2Go client at: https://wiki.x2go.org/doku.php/doc:installation:x2goclient
OS X
For Mac OS X users, X2Go might get blocked since it’s a third-party application. Go to “Security & Privacy” in your Mac to allow open X2Go client.
Also, XQuartz is required by X2Go. Additional information can be found here under the “MAC” tag.
Note: From XQuartz 2.7.9, indirect GLX is disabled by default, so you’ll need to run this command followed by a reboot:
defaults write org.macosforge.xquartz.X11 enable_iglx -bool true
To enable a true full-screen view in x2go,
Open XQuartz > Preferences > and enable Full-screen mode.
To make ⌘+V work normally, issue the following command in terminal:
echo "*VT100.translations: #override Meta <KeyPress> V: insert-selection(PRIMARY, CUT_BUFFER0) \n" > ~/.Xdefaults
Connect
To setup new sessions for hoffman2, open X2Go client and input either of the following into the “Host” form.
x2go1.hoffman2.idre.ucla.edu
x2go2.hoffman2.idre.ucla.edu
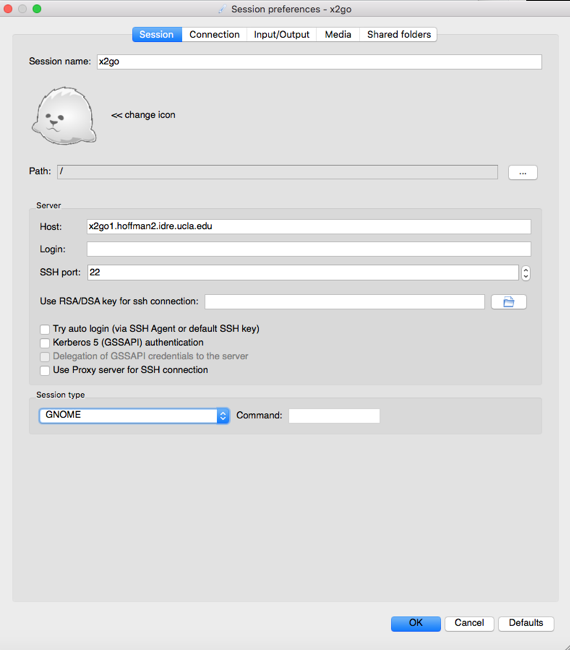
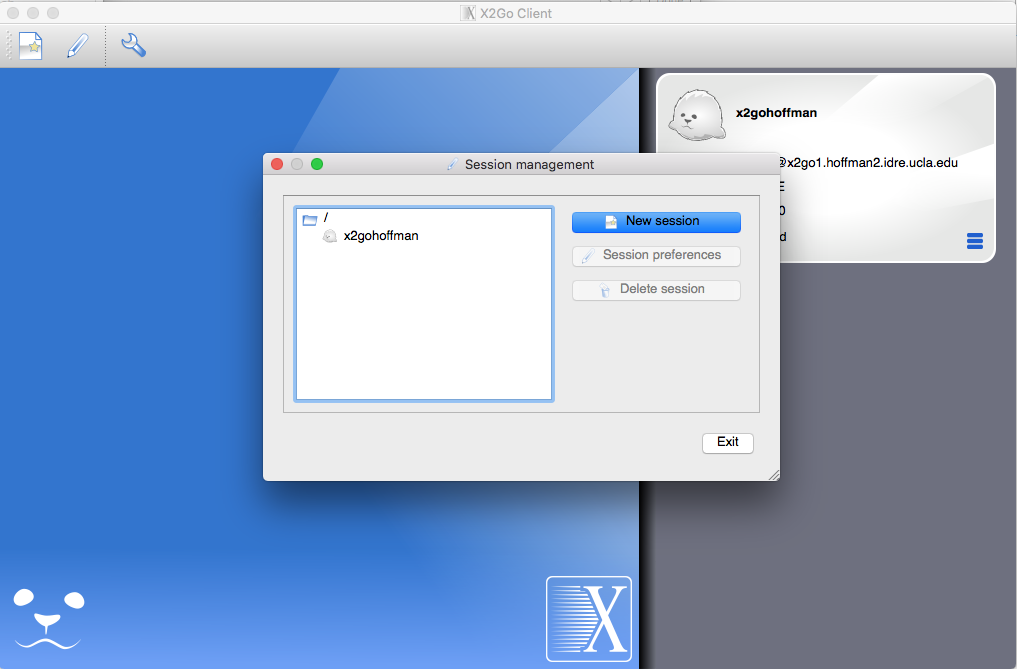
Users can set up multiple sessions connection to different servers with X2Go client.
To Add new sessions, click this icon on the top bar. Then a window pops up as “Session Management”.
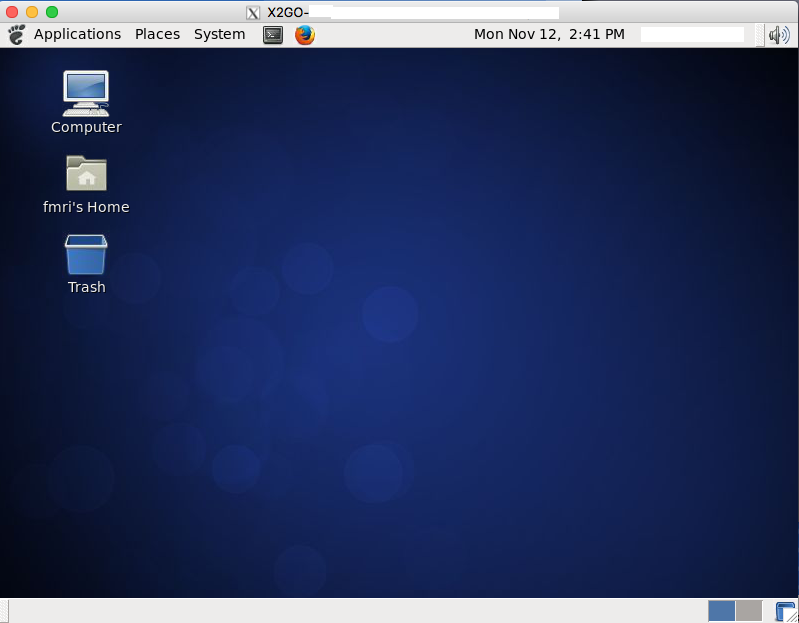
After login, the desktop Window of your Hoffman2 environment will look like this:
Read more on IDRE website
Desktop Environment Compatibility
The following desktop environments (session type) seem to be compatible with Hoffman:
KDE
MATE
XFCE
If you run into issues using KDE, switch to MATE or XFCE since they are considered lightweight GUIs (use less memory and CPU).
CentOS7 UPDATE: GNOME and UNITY are not supported at this time and may show a black screen after the connection starts.
For KDE, if fullscreen mode is switched on by default which prevents the menu bar on the bottom to show up, try to delete the following folders before reconnecting to X2Go:
~/.x2go
~/.x2goclient
from your laptop/desktop (in MacOS)
~/.x2go
~/.kde
from your Hoffman2 home directory.
Known issues
When using additional commands in ~/.bashrc or ~/.bash_profile, X2Go mistakes the output from certain commands as error messages and will crash or hang when starting a new connection.
module load
When using “module load” to load modules in ~/.bashrc or ~/.bash_profile, the output from “module load” can be misinterpreted as an error.
Solution:
For example with fsl module, edit your “module load” command in your .bashrc or .bash_profile as following
module load fsl > /dev/null 2>&1
This will redirect the output from “module load” to /dev/null
fix_perms.sh
When using fix_perms.sh or other commands to resolve permission issues when starting new shells, X2Go can freeze due to any “permission denied” messages that occur.
Solution:
Place fix_perms.sh or any other commands in ~/.bash_logout
Commands in ~/.bash_logout are issued when a bash login shell exits. This should resolve issues with X2Go and also allow users to continue using these commands.
Productivity
4.1 Scripts
4.2 Data Transfer
4.4 Tools
4.5 Mailing List
The CCN-Hoffman mailing list is used to send announcements to CCN users of the Hoffman2 cluster.
Join the mailing list:
To join the mailing list (subscribe), send a blank email to ccn-hoffman+subscribe@lists.ucla.edu.
Subscription requests will need to be approved by the list moderator.
Leave the mailing listL
To leave the mailing list (unsubscribe), send a blank email to ccn-hoffman+unsubscribe@lists.ucla.edu
^^^